Introduction
Objectives
Pre-requisites
Merchant Take-on Process
Below is a step-by-step process on how to onboard a merchant on the iVeri Administration Website:
Capturing Merchant Information
Login using the URL link for the iVeri Admin Portal and the login credentials that have been created.
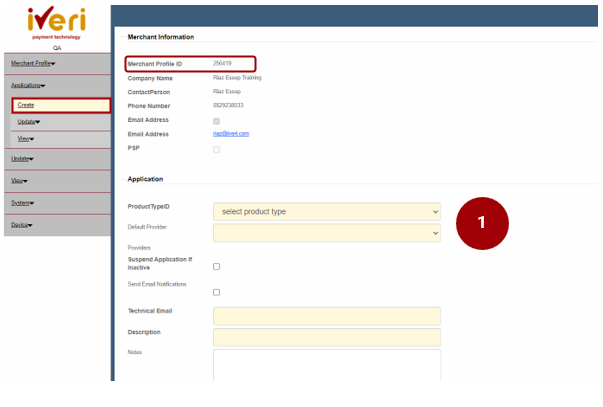
From the homepage, navigate to: ‘Merchant Profile’ > select ‘Create’.
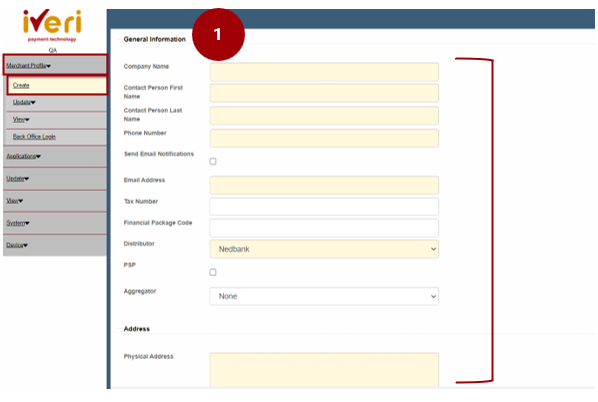
1. Under the ‘General Information’ tab, you would capture the details of the Merchant.
Note: All the Yellow fields are mandatory and would need to be captured.
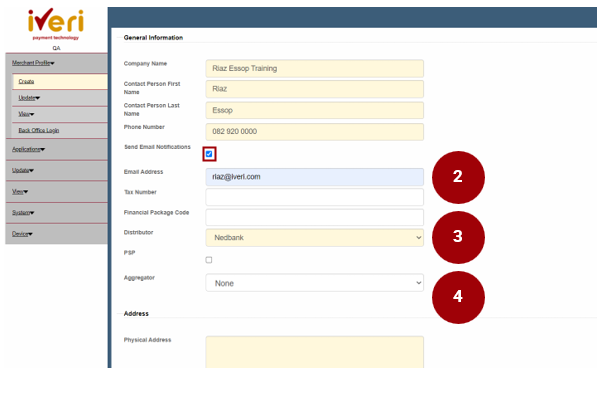
2. Send Email Notifications:
If this tab is ticked the BackOffice credentials and other notifications will automatically be sent to the Contact persons’ e-mail address.
Leave this unticked should you not want the merchant to receive e-mail notifications.
3. Ensure that the Distributor is set. Depending on the region the Merchant is in, the user must select the applicable Distributor from the drop down.
4. Aggregator is defaulted to None. Should an aggregator apply to a merchant, click on the drop down and select the aggregator.
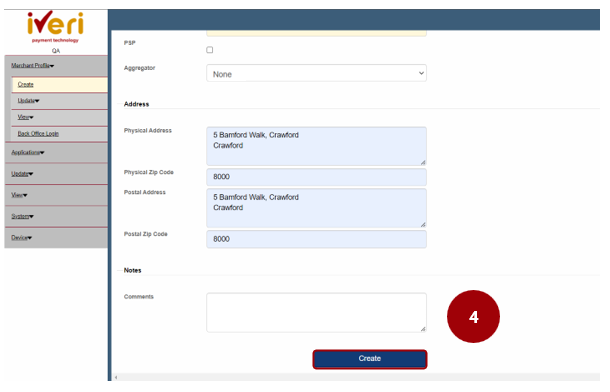
4. Scroll down to capture the Address of the Merchant.
Note: For compliance purposes, it is important that the physical and postal address of the Merchant is accurately captured in the provided fields.
Once the user has captured the address of the Merchant, click on the ‘Create’ tab.

This will now generate the iVeri Merchant Group ID number which will display on the screen, make note of it.
Under ‘Merchant information’ you would be able to view the details you have captured. The Merchant Profile ID has also been successfully generated at this point.
This screen will automatically appear.
Navigation Path to this screen:
Applications > Create.
The Yellow fields are mandatory to capture.
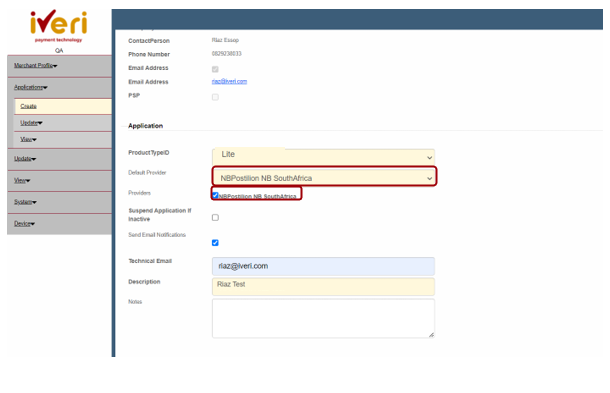
1. Application:
Please select the applicable iVeri Product from the dropdown, from the “Product Type ID value”.
Capturing Application Details and Parameters
2. Let us have a look at some of the mandatory fields that need to be captured under Application:
- Default Provider – This will be defaulted depending on the distributor. For this example, the distributor is ‘NBPostillion NB South Africa’.
- Providers – Ensure that this is always ticked.
- Suspend application if inactive – If ticked, a merchant’s application will be suspended if inactive in excess of 90 days. If unticked, the application will remain active indefinitely.
- Send Email notifications – Tick if you would like to receive e-mail notifications.
- Technical Email – Update an e-mail address that you would like to receive notifications for should any changes be made to a Merchants application.
- Description – Refers to the reference description you would like to use as an identifier for the application created.
- Notes – User can capture any additional notes for the application they are creating
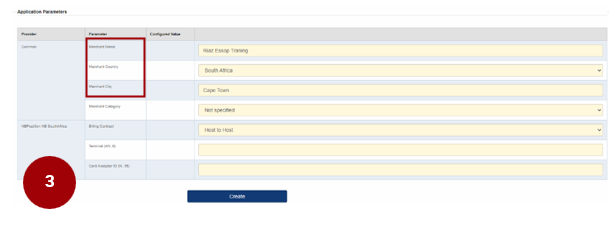
3. Application Parameters:
The Yellow fields are mandatory fields that would need to be captured.
- Capture the Merchants name.
- Merchant Country
- Merchant City
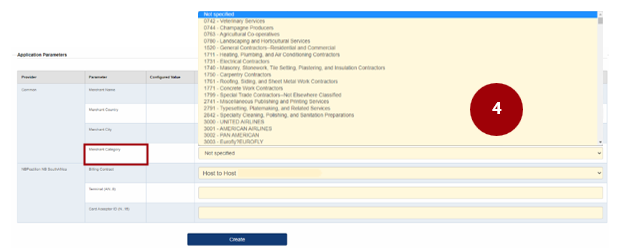
4. Merchant Category:
From the dropdown, please select the correct trade for the Merchant you are onboarding.
Note: The Merchant Category has to be captured correctly for the Merchant and must reflect their specific trade.
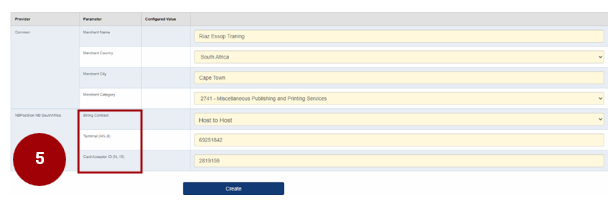
5. Complete the Nedbank Postillion details as per below:
Billing Contract remains defaulted to ‘Host to Host’.
Terminal (AN.8) as generated by the Acquirer/Supplied
Card Acceptor ID (N.15) as generated by the Acquirer/Supplied
Once the user has captured all the application parameters for the Merchant, click on the ‘Create’ tab.
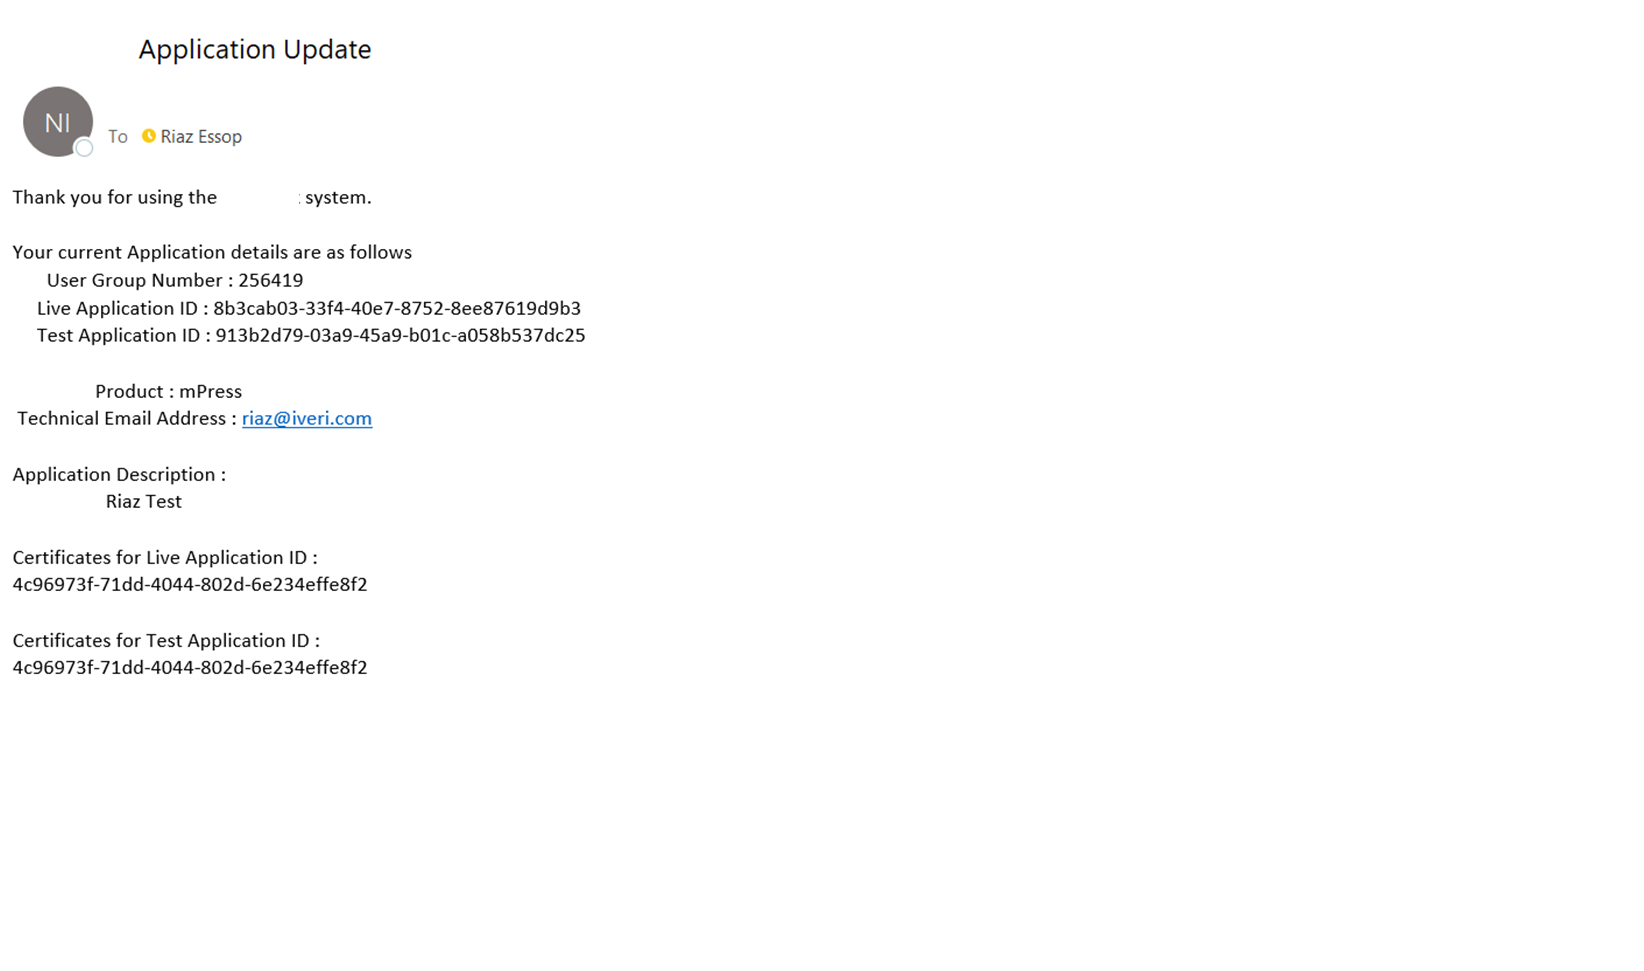
Automated Email Notifications
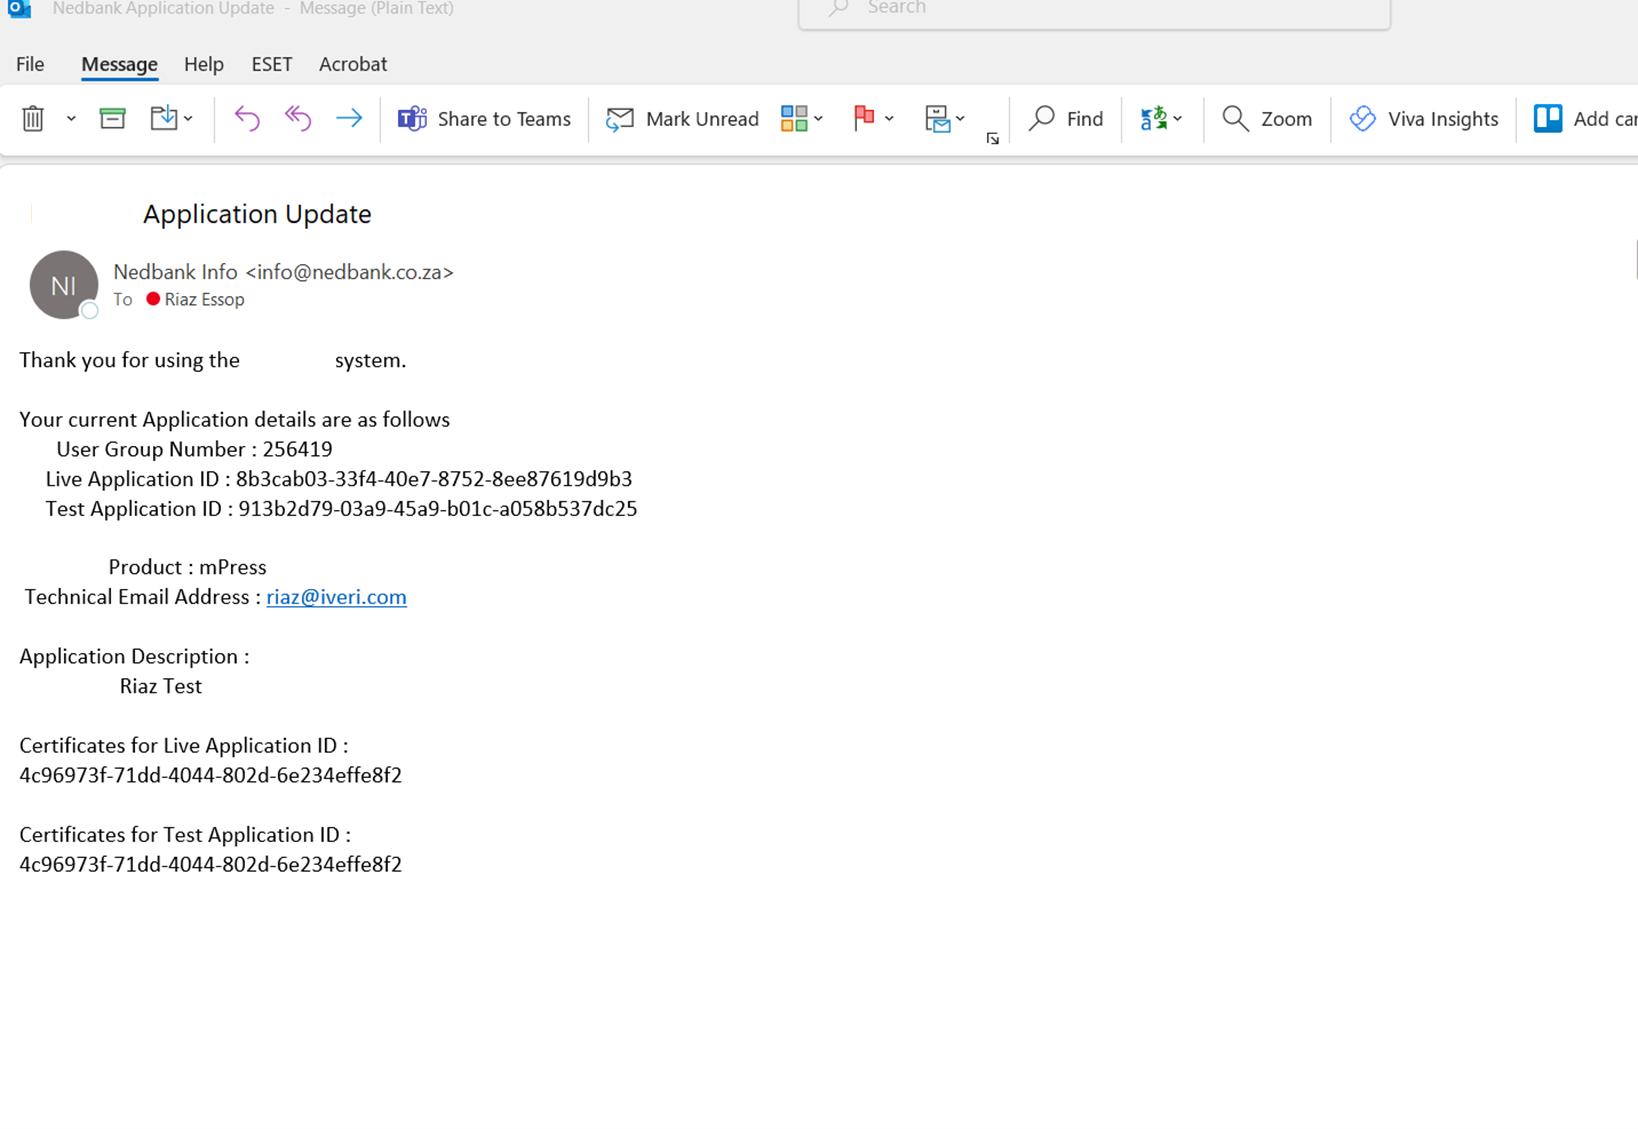
An automated system generated e-mail will be sent as confirmation for the application that was created for the Merchant.
The e-mail confirms:
Merchant Profile / User Group ID
Live and Test Application IDs
Product Type
Confirmation of the Technical e-mail address captured.
Application Description as captured on the application you have created.
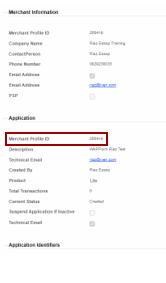
Note: Once the user has clicked on the ‘Create’ tab the BackOffice Services screen will appear.
From this screen you will note the Merchant Profile / User Group ID.
The Merchant Profile / User Group ID is especially important when logging a query. This must be provided at all times.
The Merchant Profile / User Group ID will also reflect on your daily report you receive.
Updating BackOffice Services
Application Identifiers:
There are 2 application modes: Live and Test.
To ensure updates and changes are configured for a merchant’s application, select the LIVE application.
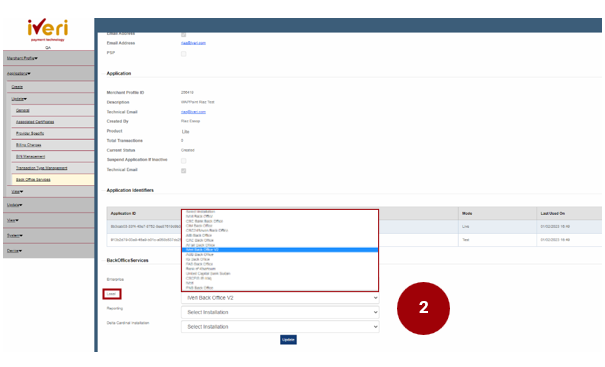
BackOffice Services:
How to navigate to the BackOffice Services screen:
Applications > Update > BackOffice Services
1. This is where BackOffice Services are created for the merchant. This is a mandatory step that would need to be updated in order to activate an application for a Merchant.
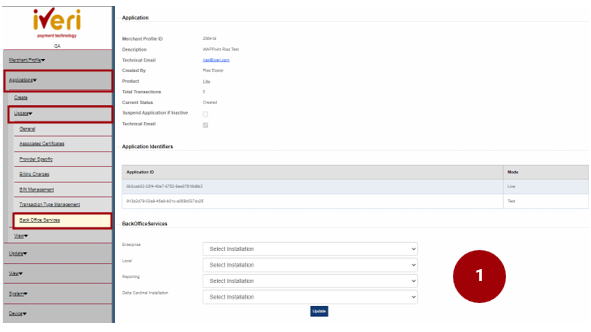
2. Under BackOffice Services, under ‘Local’, click on the dropdown and navigate your way to the ‘iVeri Back Office’ option.
This update will provide the Merchant access to BackOffice.
Once the user has captured the details under Local, click on the ‘Update’ tab.
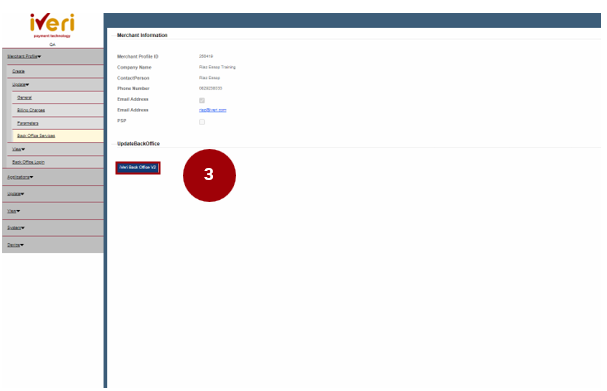
This following screen will now appear.
3. Under the ‘Update BackOffice’ tab, the user would need click on the ‘iVeri Back Office’ tab.
Note: The purpose of this update is to sync the new merchant application that you have created to iVeri BackOffice.
4. This Merchant page will appear. Click on ‘Update’ to synch the new application to BackOffice for this Merchant.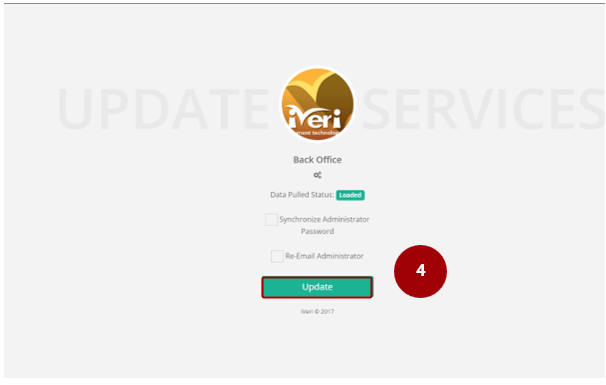
5. The following screen will appear confirming the successful update.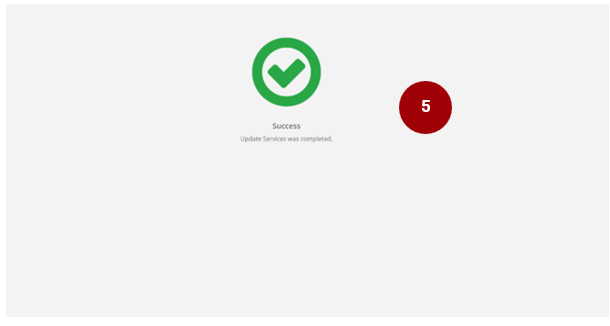
Setting the Application to Active
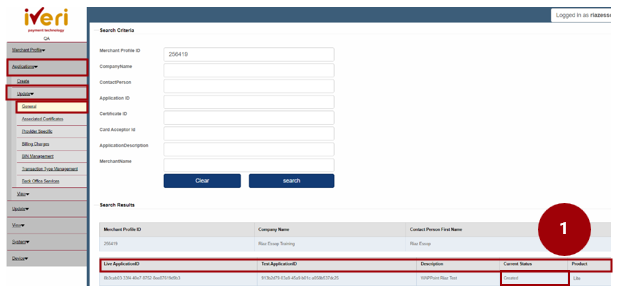
How to Navigate to this Screen:
Applications > Update > General
The current Merchant application that you have created will be defaulted to ‘Create’ status.
The user would need to change and update the status from ‘Create’ to ‘Active’.
1. Click on the ‘Live’ Application ID.
The following screen will appear.
2. Navigate your way to ‘Current Status’ and from the dropdown select ‘Active’.
Once you have made the selection, click on ‘Update’.

The below successful message will then appear on the top of the same screen confirming that the Update was successful:


3. This is a sample of the confirmation e-mail the Merchant will receive confirming that their application has been successfully updated.