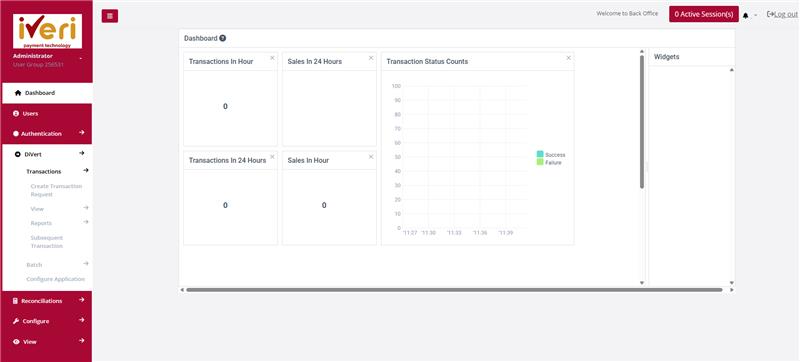
DiVert
Transactions
Create Transaction Request
Purpose - This function allows you to create a request for payment to be sent to cardholder
Action:
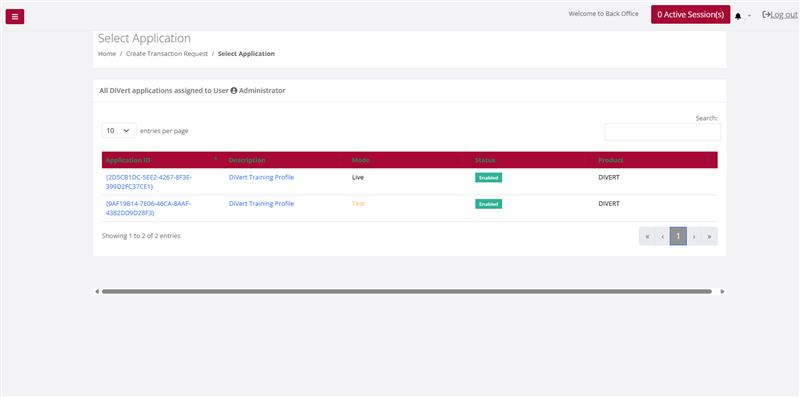
To create a transaction request, start by navigating to the DiVert tab on the homepage. Then, select Transactions and click on Create Transaction Request.
Action:
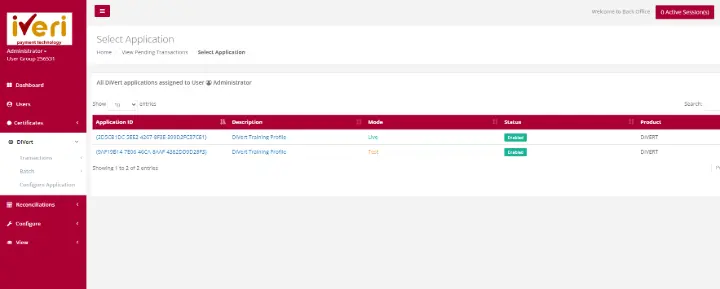
Here, choose the Live application ID. Once selected, you’ll be redirected to the Create Transaction Request form, where you can enter all the transaction details.
![]()
Let’s go through the details you’ll need to enter when creating a transaction request:
- Cardholder Name: Enter the cardholder’s name exactly as it appears on the card.
- Cardholder Email: Input the cardholder’s email address. This is where the secure payment link will be sent.
- Order Description: This field is optional. If filled in, the description will appear on the secure payment page, describing the goods or services provided. Be aware that if you enter an order description, it will override the email’s subject line, even if you’ve set a custom subject in the DiVert application settings. To retain your default subject, leave this field blank.
- Transaction Amount and Currency: Enter the transaction amount. The currency will be preset according to the Acquiring bank’s country and currency based on the merchant agreement.
- Transaction Type: By default, this is set to "Sale." You can also choose "Authorization" if the transaction is for reserving funds, depending on the nature of the business.
- Request Expiry Date: You can set a payment link expiry date. Simply select a future date on the calendar, determining how long the cardholder has to complete the payment. Once the expiry date is reached, the payment page will no longer be accessible unless the merchant resends the notification with a new expiry date.
- Merchant Reference: Enter a unique reference number for this transaction. Be careful not to duplicate this reference within six months, as the system won’t allow duplicates within this time frame.
- Allow Budget Period: This setting is defaulted to “No.” If the cardholder requests a budget payment option, select "Yes" from the dropdown menu.
- Attach Invoice: You have the option to attach a PDF invoice to the email sent to the cardholder. Make sure it doesn’t exceed 300 kilobytes.
Once you’ve reviewed all the transaction details, click Submit.
![]()
An automated notification will confirm that the transaction request has been successfully created and that an email has been sent to the cardholder’s e-mail address.
View
Expired
Purpose - Expired transaction requests can now be viewed and can help a user track links that have reached their expiration dates as set when creating a transaction request. The user will be able to edit the transactions and resend the notification.
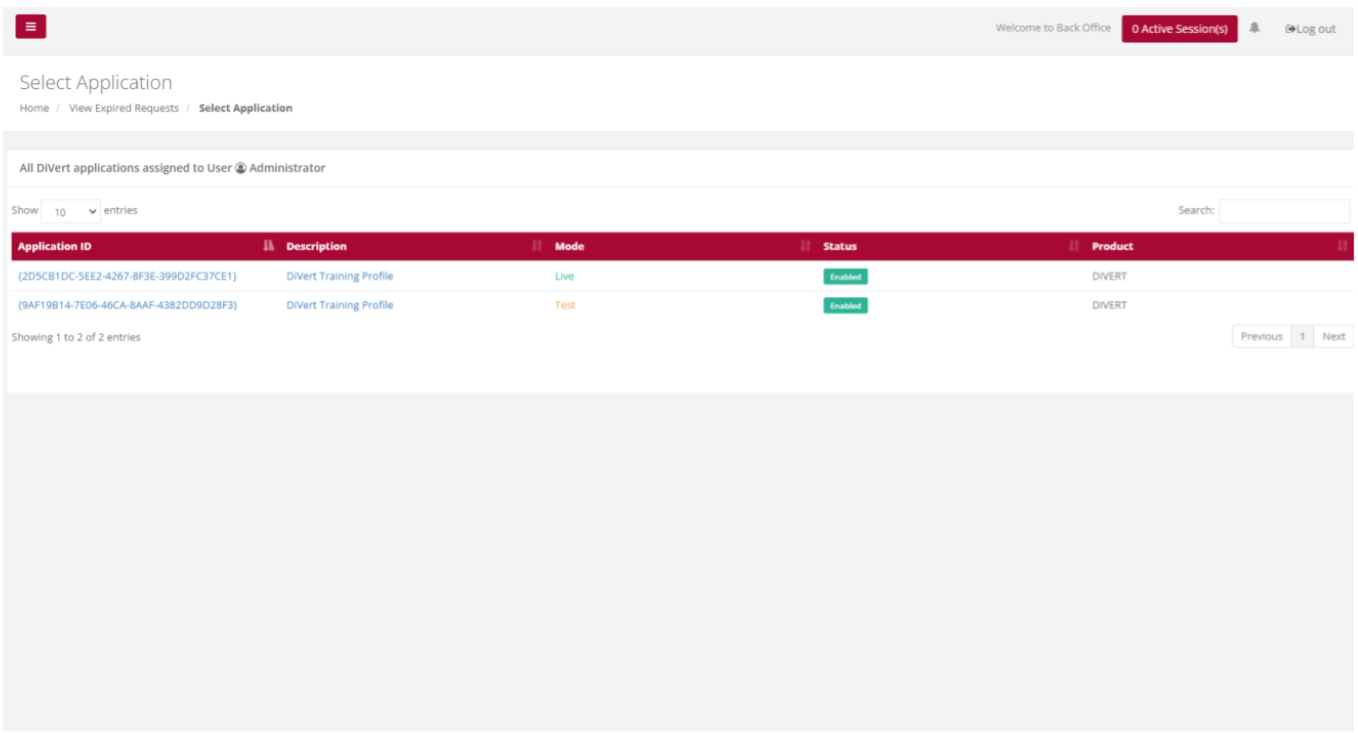
In BackOffice, the user will navigate to: DiVert > View > Expired.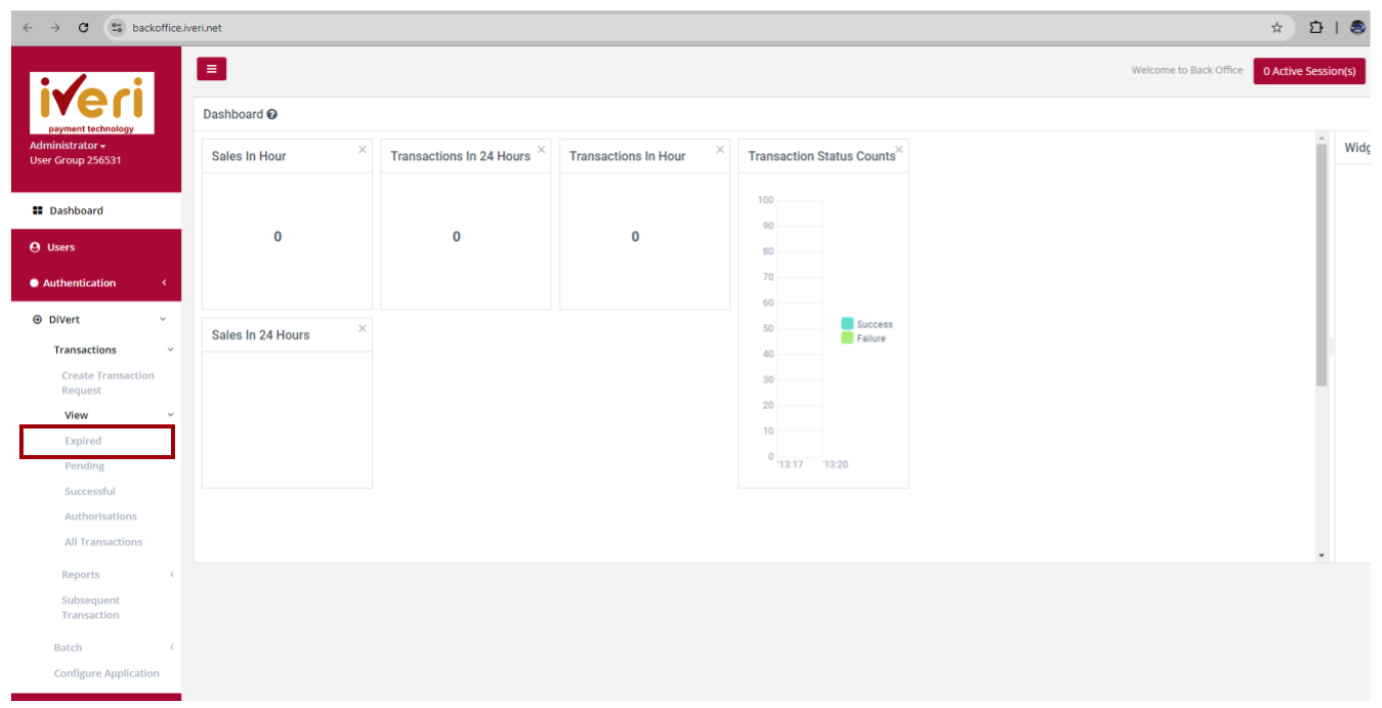
Select the applicable Application ID.
Select the date range for the transactions you would like to view.
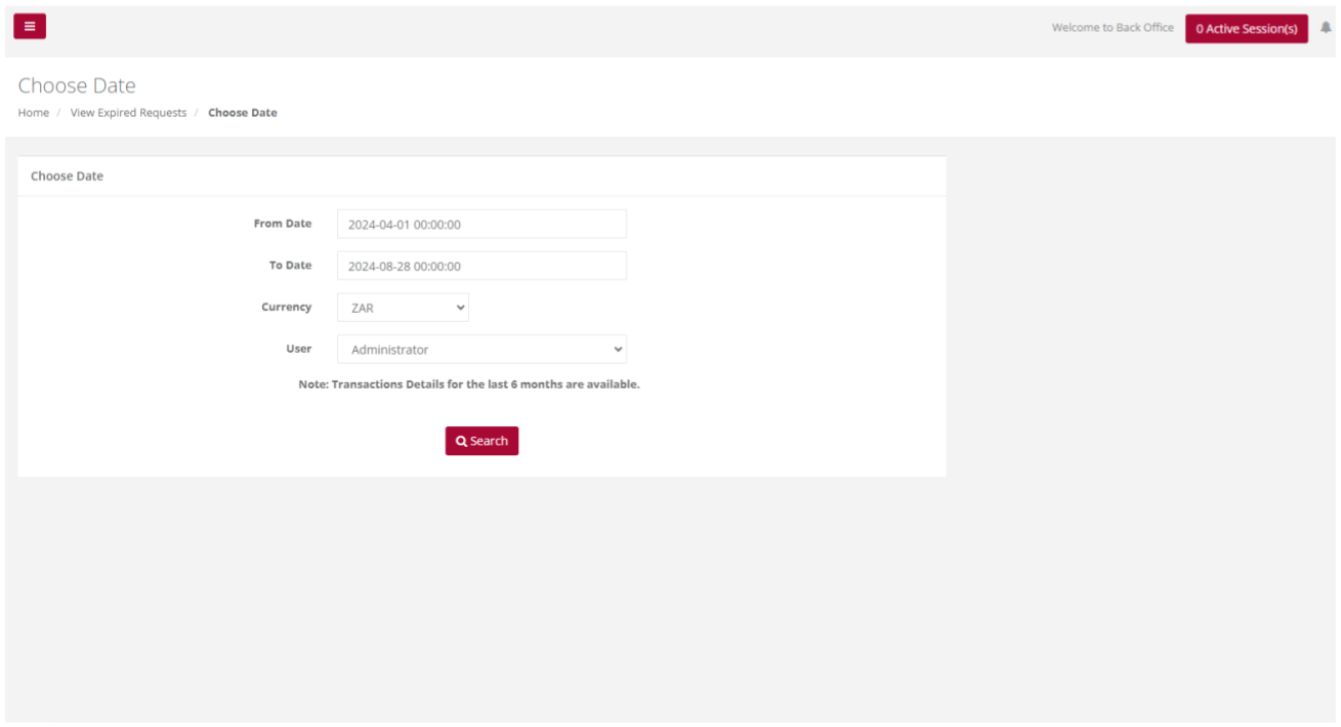
The user will be able to view the Expired requests for the date range they have entered.
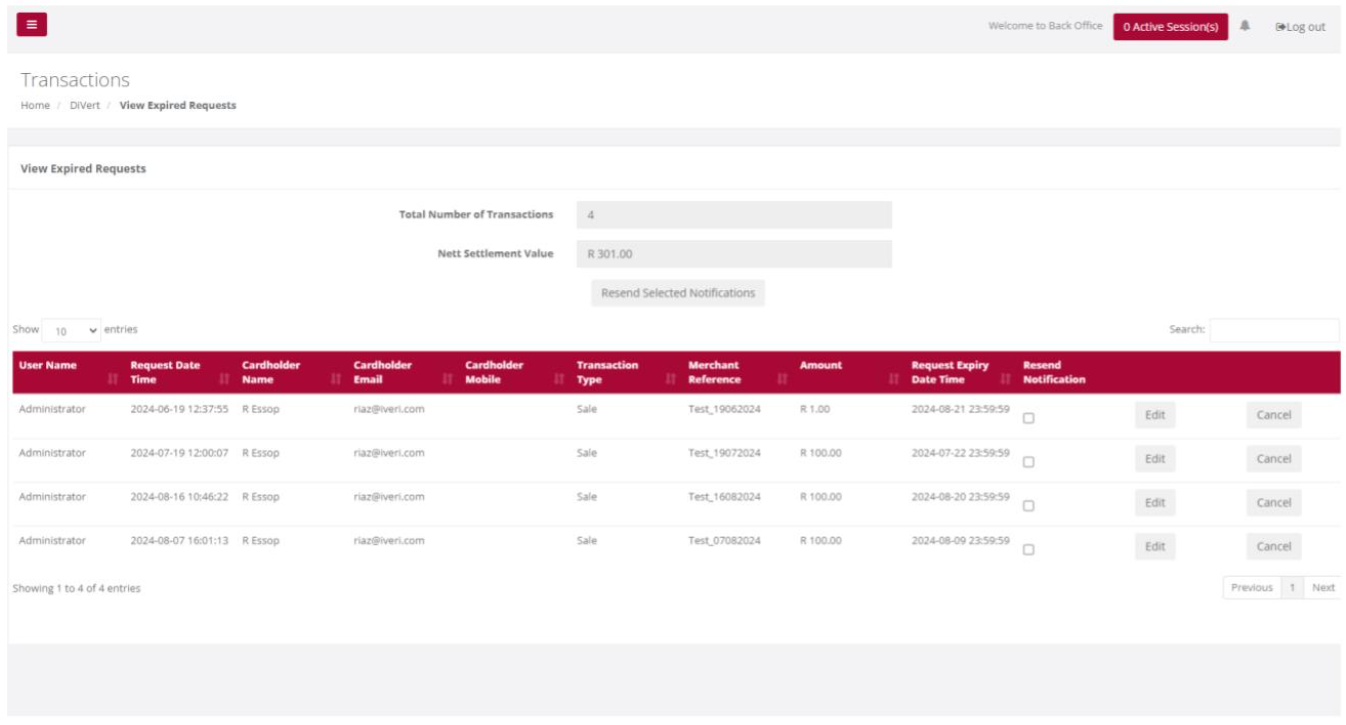
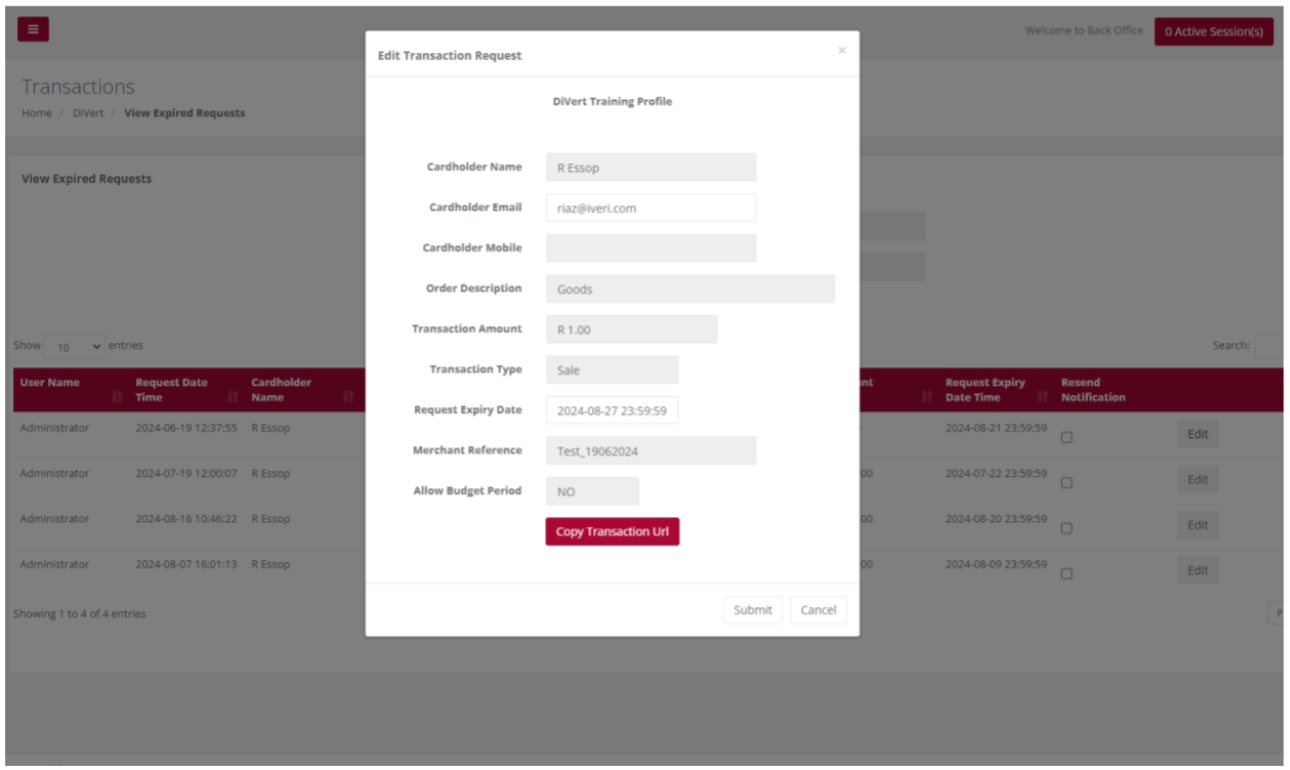
To edit an expired request, click on the 'Edit' tab. A form will appear that allows you to adjust the 'Request Expiry Date.' After making the necessary changes, click 'Submit' to save the updated transaction request.
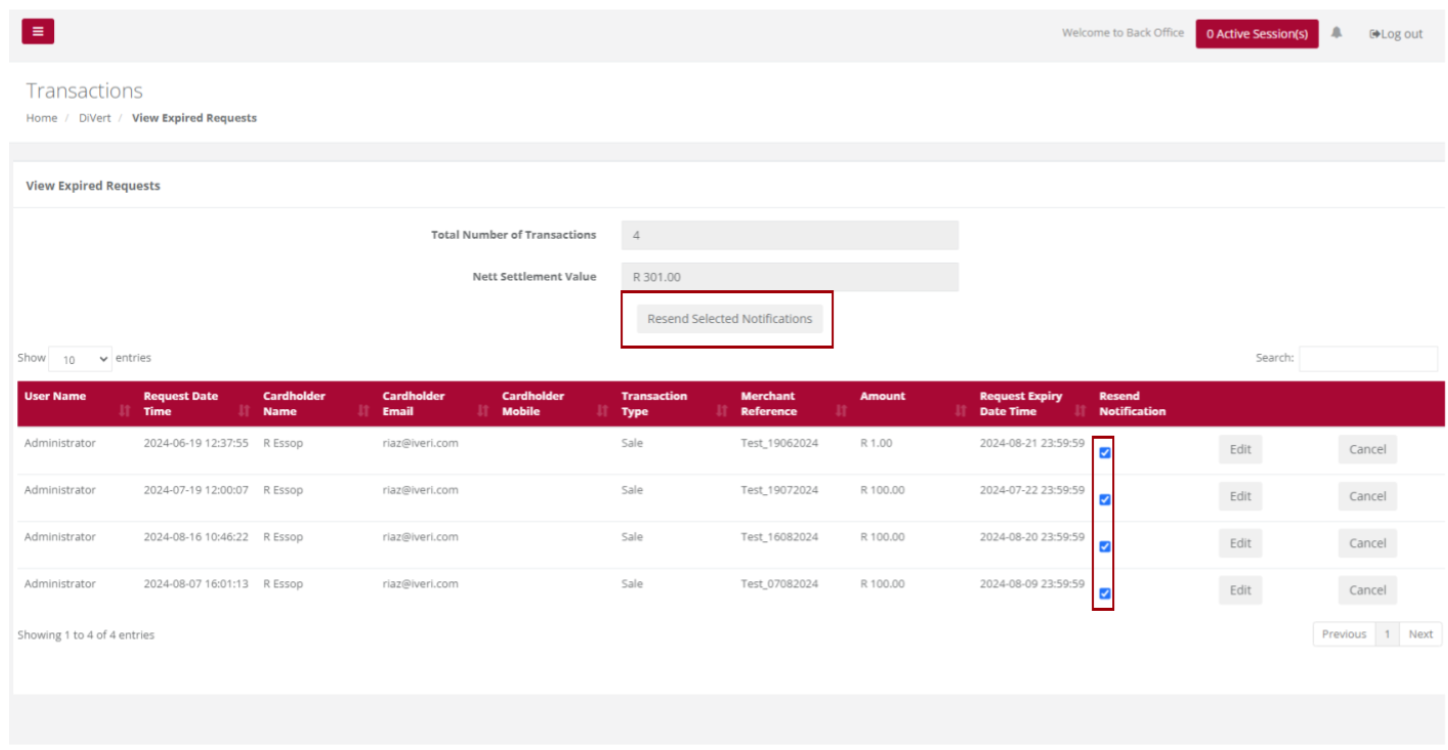
To resend multiple expired transaction requests, tick the checkboxes next to each transaction you want to resend. Once all selections are made, click on the 'Resend Selected Notifications' tab to resend the notifications in bulk.
Pending
Purpose - view the list of Pending transactions for a selected Date or Period in order to check these against your confirmation emails or to view ALL details related to individual transactions.
Pending Transactions may result, where a transaction request was created, but payment has not yet been actioned by the cardholder.
The user is able to view pending transactions as a means to follow up with a cardholder.
Action:
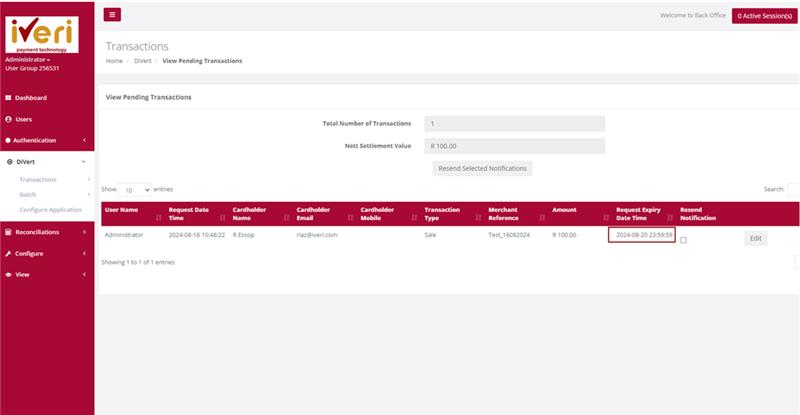
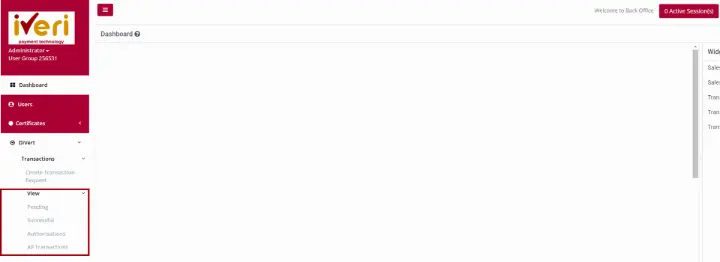
In the menu bar, select DiVert, View, and then select Pending.

Choose an Application ID
Choose a Date Criteria and select Search
Action:
To resubmit the transaction request, click the 'Edit' tab and then select 'Submit.' Alternatively, you can copy the transaction URL by clicking 'Copy Transaction URL' to share the link with the cardholder through a different communication channel, allowing them to access the secure payment page.

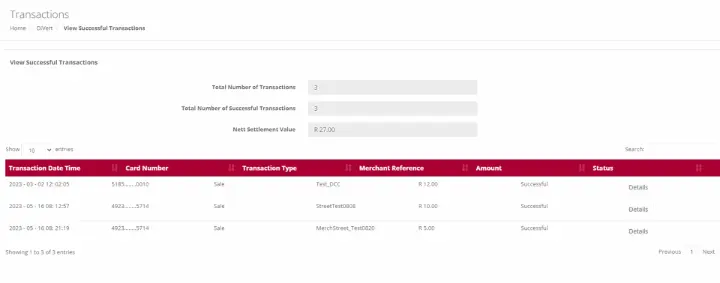
Successful
Purpose - To view the list of Successful Transactions’ for a selected Date or Period in order to check these against your confirmation emails or to view ALL details related to individual transactions.
Action:
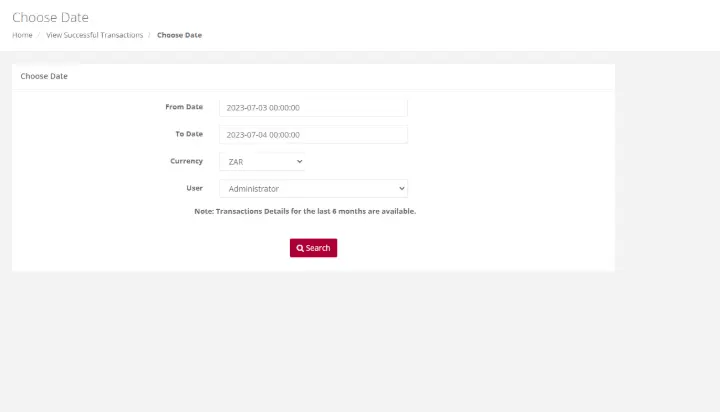
In the menu bar, Select DiVert, Transactions, View Successful. Click on the Application ID you wish to view Successful Orders for. Select the Date or Date range and click on Search. This will bring up the following pages for viewing.
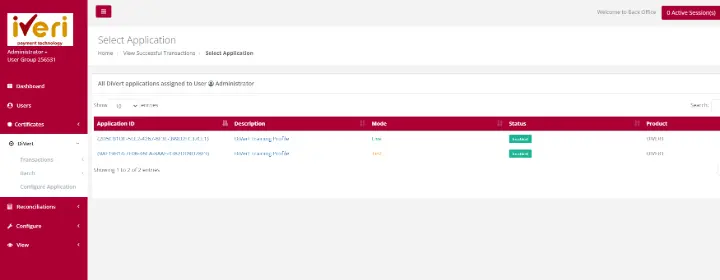
Choose a date and select Search
The Administrator or users who have been granted the necessary access will be able to view all successful transactions for ALL users.
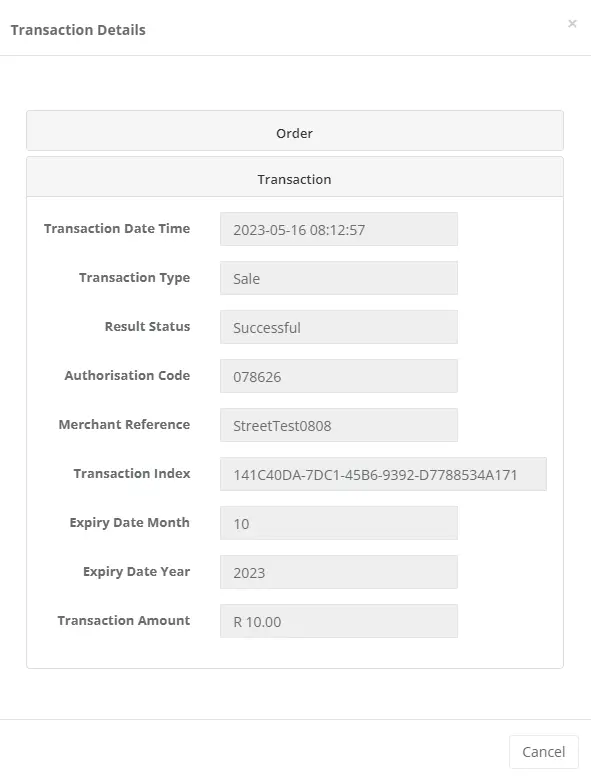
Action:
If a user wants to view the details (above) of the transaction, edit is selected to see more information pertaining the transactions
Authorisations
Purpose - To view the transactions for which you originally only obtained an Authorisation. This allows you to now use that Authorisation code to Debit the cardholder by doing a Subsequent Transaction to debit the cardholder and obtain the money in your bank account.
Action:
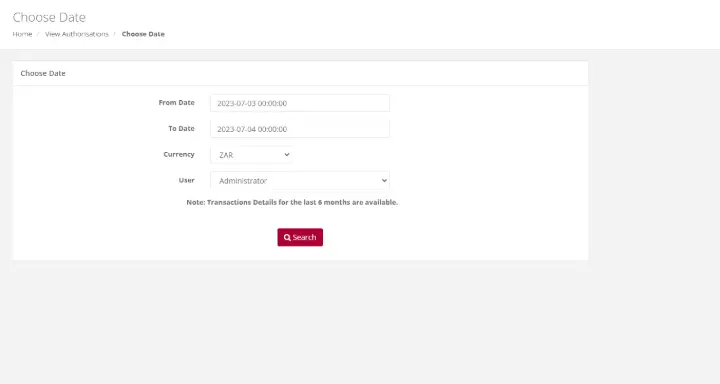
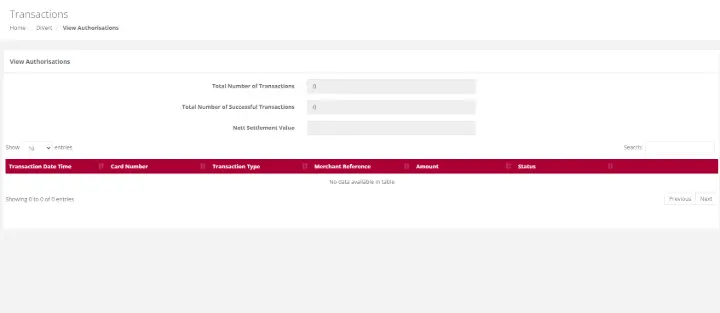
In the menu bar, Select DiVert, Transactions, View Authorisation. Click on the Application ID you wish to view Authorisations. Select the Date or Date range and click on Search. A list of transactions will be displayed

Choose a date and select Search
All Transactions
Purpose - To view a list of all transactions performed for a selected Date or Period.
Action:
In the menu bar, select DiVert, Transactions, View All Transactions. Click on the Application ID you wish to view Transactions. This will bring up the list of ALL transactions performed for your selection.
![]()
![]()
![]()
Action:
The search tool helps you quickly find specific transactions in the table. It includes three inputs and a Clear Filter button to reset your criteria.
- Choose a Filter
- Use the dropdown list to select the parameter you want to search by (e.g., Merchant Reference, User Name, Transaction Date/Time, Card Number, Transaction Type).
- Select a Comparison Option
- “=” for an exact match
- “like” for partial matches (e.g., contains your input)
- Enter Your Search Value
- Type the value you want to find (e.g., Merchant Reference number).
Example:
If you search for Merchant Reference like “CRA624083”, the results will include all references containing that value. For an exact match, use “=” followed by the full reference.
Click Clear Filter anytime to reset your search.
![]()
Reports
DiVert Trading
Purpose - To view a list of all transactions performed for a selected Date or Period.
Action:
In the menu bar, select DiVert, Transactions, Reports, DiVert Trading Click on the Application ID you wish to view Transactions. This will bring up the list of ALL transactions performed for your selection.
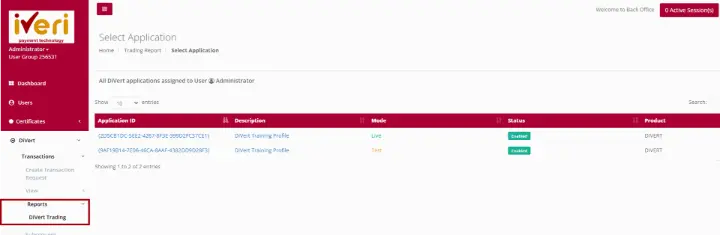
Choose a date and from the user tab, please select from the dropdown ‘All’. This will ensure that the report extracted will include all users who have created transactions.
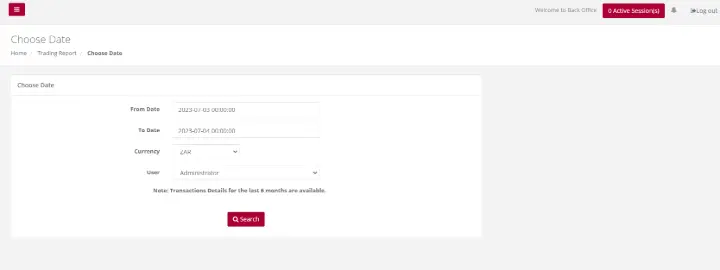
Choose the applicable form to download the Trading’ report on a particular Application ID

Subsequent Transaction
Purpose - Subsequent transactions allows a user with the correct permissions to further action a transaction that has been successfully processed. You can change the transaction type to Authorisation to a Sale or a Sale to a Refund.
![]()
Action:
Click on the appropriate Application ID in which you can view transactions that have been processed. Once the transactions details are displayed you, perform refunds, or do a debit
![]()
Action:
Select the Date on which the original transaction took place from the drop down menu or select a period if you are not sure of the exact date and click on Search. This will bring up a summary list of all the transactions which match your search selection.
![]()
Action:
Scroll through the summary list until you find the transaction you want to take the action on. To make sure that it is the correct transaction, click on the Details button on the right to bring up the full details of the transaction.
![]()
![]()
Once edit is selected click on submit to continue the refund on the particular transaction. As you can see the transaction automatically goes to refund.
If this was an Authorisation transaction, under transaction type, you could also use this subsequent transaction option to authorize (Bank) the Authorized transaction by selecting Authorize Sale under Transaction Type
Configure Application
Purpose - Configuring your application is important. Configuring your application needs to take place before a user is able to create a transaction request. The user would need to configure:
- If E-mail confirmations can be sent to a cardholder.
- Confirm the E-mail address confirmations are sent to and from.
- Receive a copy of the payment request that has been sent to the cardholder.
- Customise the message on payment page.
- Customise the message on payment request e-mail.
- Link Merchants Terms and Conditions
- Show Associated Logos
Action:
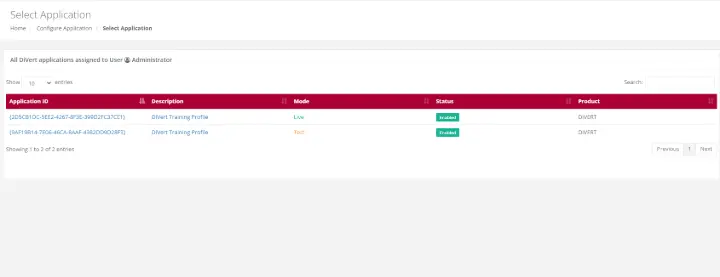
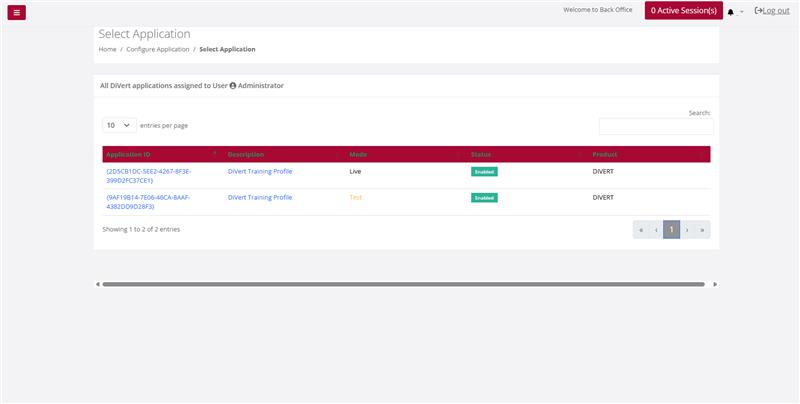
On the main menu go to DiVert – Configure Application.

Action:
Click on the Application you want to configure, i.e., either the Test or the Live. To make the relevant changes, click on Save Changes.
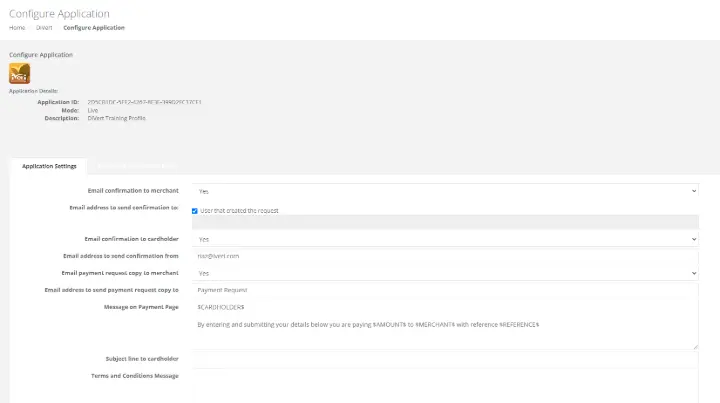
E-mail confirmation to merchant - To receive e-mail confirmations such as e-mail notifications for successful transactions, from the dropdown, select ‘Yes’.
E-mail address to send confirmation to - Here, the user can choose whether the email confirmation is sent to a specific email address or to the user who created the transaction request. By default, the confirmation is sent to the user who initiated the transaction. To specify a different email address, deselect the checkbox and enter the desired email address.
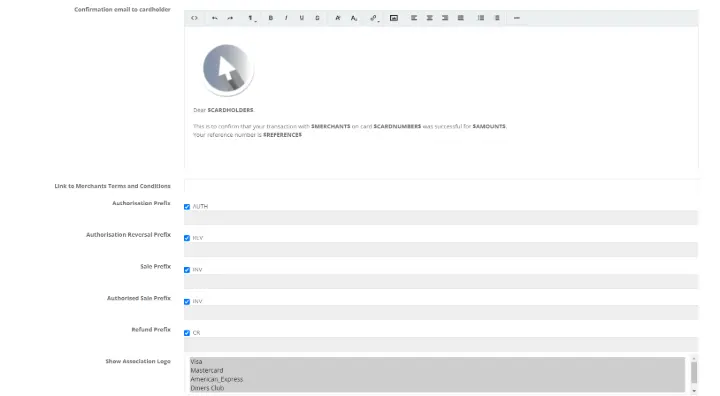
E-mail confirmation to cardholder – Here, the user can choose whether to send an email confirmation to the cardholder after a successful transaction. Select ‘Yes’ from the dropdown menu if you want the cardholder to receive email notifications.
E-mail address to send confirmation from – When a successful transaction is processed, the system will utilise the e-mail address captured here by the user to send the e-mail confirmations to. This e-mail address will not be utilized when a payment link is created and sent to the cardholder. The defaulted e-mail address will be used as captured during the onboarding process from the Acquirer.
E-mail payment request copy to merchant – Should the merchant want a copy of the transaction requests that have been created, from the dropdown, the user will select ‘Yes’.
E-mail address to send payment request copy to – Here the user can select the e-mail address they would like the payment request copies to be forwarded to.
Message on payment page – When the cardholder interacts with the secure payment page, this is an illustration of the message that will display. It is important to mention that the information between the dollar signs is automatically populated based on the information captured during the transaction request creation. This information should not be altered and must be left untouched. Apart from the information within the dollar signs, the user can customize the message that will display for the cardholder.
Subject Line to Cardholder – This refers to the subject line of the email notification containing the payment link that is received by the cardholder. The subject line should be concise and clearly identify the merchant to the cardholder. Please note that if the user completes the "Order Description" field while creating a transaction request, this will override the default subject line set in the application settings. In other words, whatever is entered in the "Order Description" will appear as the subject line in the email sent to the cardholder.
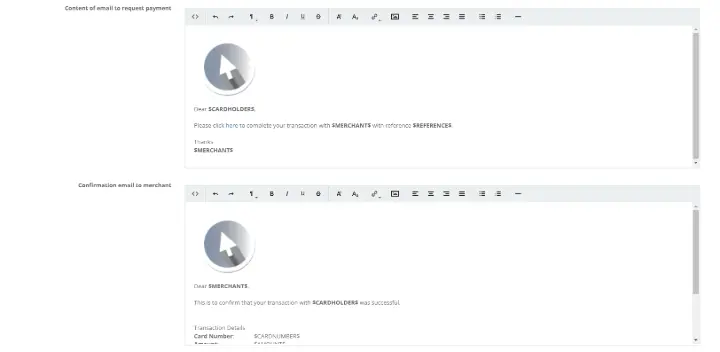
Content of e-mail request to payment – This example shows the content included in the email sent to the cardholder requesting payment. Please note that the content between the dollar signs will automatically populate based on the details provided when creating the transaction request and should not be altered. The same goes for the hyperlink directing the cardholder to the secure payment page.
Users can also customize the default image that appears in the email notification. By selecting the insert image icon, users can insert the image URL from their website. Additionally, users can use the available settings to adjust the layout of the message sent to the cardholder. These configuration options apply to all email notifications in the application settings.
Confirmation email to merchant – This confirmation is received by the merchant only upon a successful transaction, provided that email notifications have been configured. The e-mail will contain pertinent details related to the transaction. As previously mentioned, the information between the dollar signs will be automatically populated and should not be altered.
Confirmation to Cardholder – This is an email confirmation that the cardholder will receive for a successfully processed transaction. This notification can be customized, except for the information contained within the dollar signs, which should not be altered.
Link to Merchants Terms and conditions and Terms and Conditions message – We will address both fields simultaneously. Merchants with a website can insert the URL linking to their Terms and Conditions. Merchants without a website can manually enter their Terms and Conditions in plain text. When entering Terms and Conditions manually, ensure all commas are removed from the text, as their presence will prevent the changes from being saved. Once successfully captured, the Terms and Conditions will appear on the secure payment page. The cardholder must accept the Terms and Conditions by ticking the checkbox to complete the payment process.
Payment Session Timeout (seconds) – This field specifies how long a payment session remains active before timing out. By default, the timeout is set to 5 minutes, or 300 seconds. If the merchant wishes to extend the session timeout, they should enter the desired duration in seconds.
Prefixes – The prefixes section is defaulted and can be skipped.
Show Association Logo – The user can display the card association logos they accept, based on the agreement with their acquiring bank. These logos will appear on the secure payment page as shown. To select multiple card associations, hold down the CONTROL key on the keyboard while making your selections.
Default payment method - The default value is set to Card Payments. Merchants registered for Visa Checkout or Masterpass can choose these options as their default payment method.
Transaction form
To navigate to the Customise Transaction form:
From the home page select, DiVert, Configure Application. From the Select Application page, select the application ID you would like to customise. The user will then navigate to the "Customize Transaction Form" tab, which will redirect them to the "Customize Transaction Form" page.
On this page, the user can customize and preview the payment’s page appearance.
![]()
Uploading a Logo:
Navigate to the "Upload Logo" tab and click on the expansion button.
Click on the "Choose File" tab to open your file directory.
Select the image you want to upload and click "Open."
Please note that the accepted file formats are JPEG and PNG. When uploading your image, the following information must be considered regarding file size, image height and width:
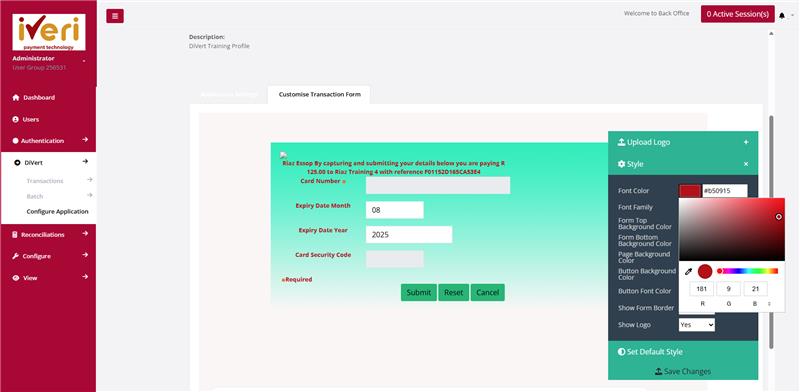
Configuring the Style of the payment page:
The user can customize the font color on the payment page. To do this, navigate to the "Font Color" section and click on the provided square. This will display the color wheel. There are three ways to customize the font color:
Using the color spectrum: Adjust the color directly on the spectrum as shown.
Entering RGB values: The RGB model is an additive color model using Red, Green, and Blue to create a wide range of colors. Use this option if you know the specific RGB values.
Entering Hexadecimal code: A hex color code is a six-symbol code made up of three two-symbol elements. Enter the hex code if you know it.
To save the color you have customized, click on the color wheel as shown. If you do not click on the color wheel before saving changes, the default colors will be applied. This process applies to any customizable color on the payment page, including Form Top Background Color, Form Bottom Background Color, Page Background Color, and Button Background Color.
Font Family - The user can select from a range of fonts to best suit their payment page.
Show Form Border - The user can choose whether to apply a border around the payment page or to remove it.
Show Logo - The user can decide whether to display the uploaded logo or not.
To reset the payment page to its default settings, click on "Set Default Style."
Finally, review all the customizations to ensure they are correct, and click "Save" to maintain your changes.