Merchant Onboarding Guide
Introduction
The documentation, titled Merchant Onboarding Guide, is intended to provide a comprehensive and methodical explanation of the merchant onboarding process within the Standard Bank Administration Website. The Merchant Onboarding Guide provides the onboarding process for Card Not Present iVeri solutions.
Objectives
The purpose of this user guide is to assist users in navigating the merchant take-on process by providing step-by-step visual representations on the screen.
Accompanied by detailed explanations, these screen representations aim to enhance the user's understanding of the iVeri administration website interface.
The guide contains all the essential information for users to successfully onboard a merchant. It also covers typical scenarios that may arise based on the merchant's requirements.
Administration Website – User Profile Creation and Login Credentials
Prior to creating a user profile, Acquirers will be required to provide the following user information to create a user profile via the Administration Website:
- Name
- Surname
- E-mail Address
- Contact number
This request must be sent to assist@iveri.com. iVeri support is responsible for configuring the user profiles.
The URL and login credentials will be shared with the user so that they may access the Administration Website.
Merchant Take-on Process
Below is a step-by-step process on how to onboard and configure a merchant on the iVeri Administration Website.
1. User Group Capture
Login: Using the URL link https://admin.host.iveri.com for the iVeri Admin Website and login credentials that have been created & e-mailed to the user.
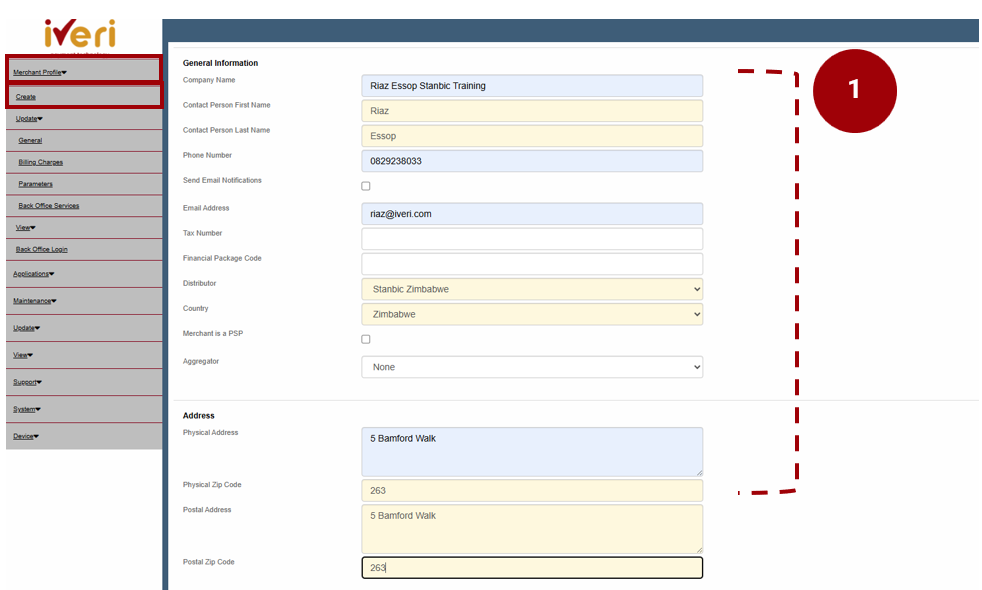
From your homepage, navigate to: ‘Merchant Profile’ > select ‘Create’.
1. Under the ‘General information’ tab, you would capture the details of the Merchant.
Note: All the Yellow fields are mandatory and would need to be captured.
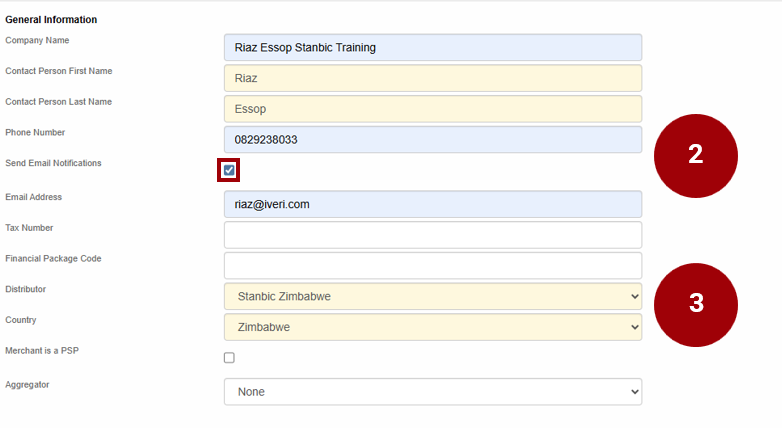
2. Send Email Notifications:
If this tab is ticked the BackOffice credentials and other notifications will automatically be sent to the Contact persons’ e-mail address.
Leave this unticked should you not want the merchant to receive e-mail notifications.
3. Distributor:
Ensure that the Distributor is (which is set to the bank’s name i.e., Stanbic Zimbabwe is set).
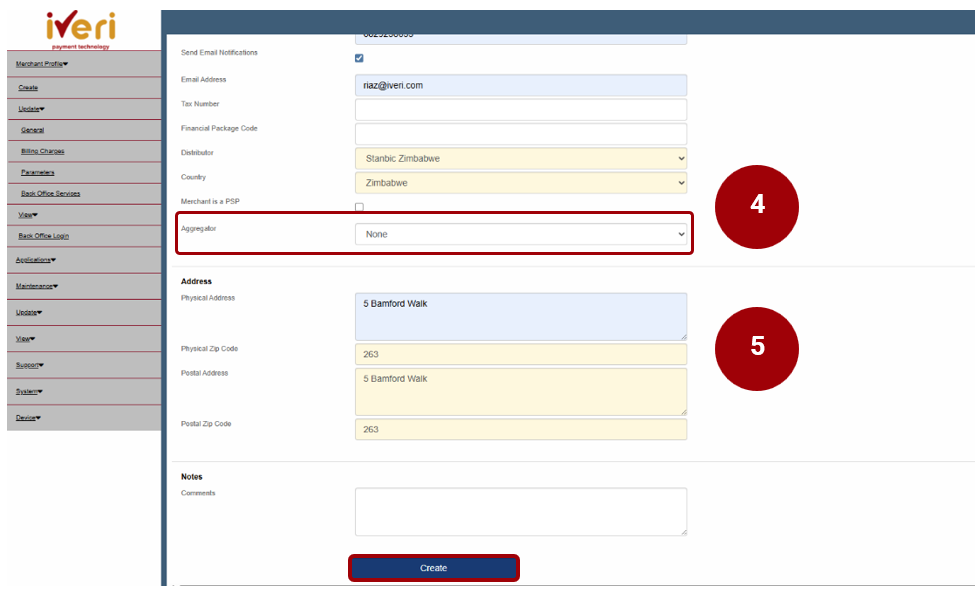
4. Aggregators:
Aggregators facilitate payment processing for merchants, acting as intermediaries. Acquiring banks settle payments to the aggregator, who subsequently settles funds to their associated merchants. If the merchant belongs to an aggregator, users can select the appropriate aggregator from the dropdown menu. Should the merchant not belong to an aggregator this step must be skipped and left to the default value.
5. Scroll down to capture the Address of the Merchant.
Note: For compliance purposes, it is important that the physical and postal address of the Merchant is accurately captured in the provided fields.
Once the user has captured the address of the Merchant, click on the ‘Create’ tab.

This will now generate the iVeri Merchant Group ID number which will display on the screen, make note of it.
5. The ‘Adding integrator’ field should be left unchanged.
Should the merchant be processing through an integrator/Payment service provider, the following steps should then be followed:
Adding an Integrator:
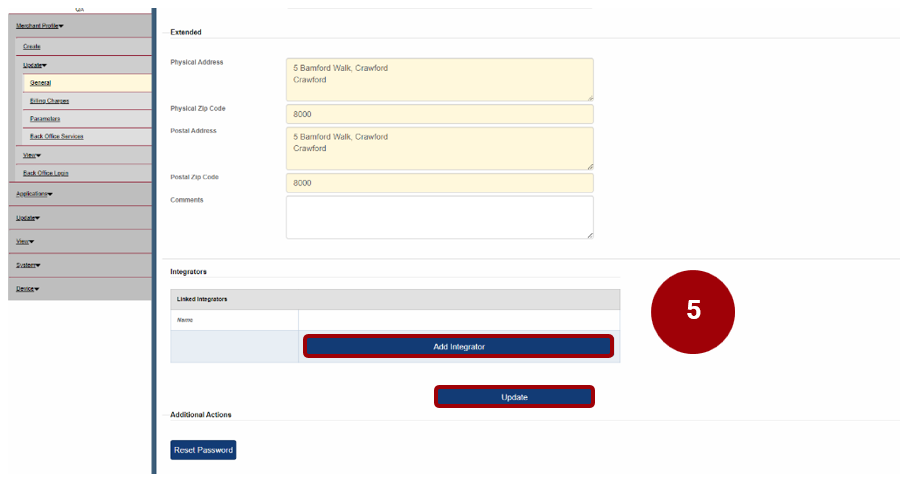
Navigation Path: Merchant Profile > Update > General.
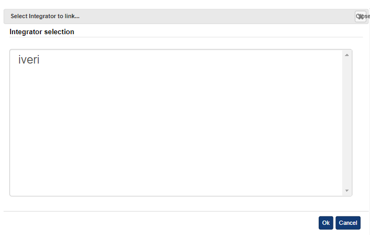
Click on the ‘Add integrators’ tab to access the list of integrators.
The default integrator that needs to be selected is ‘iVeri’.
Once you have selected ‘iVeri’ click on ‘Ok’.
To ensure the changes are effected, click on the ‘Update’ tab.
2. Applications > Create
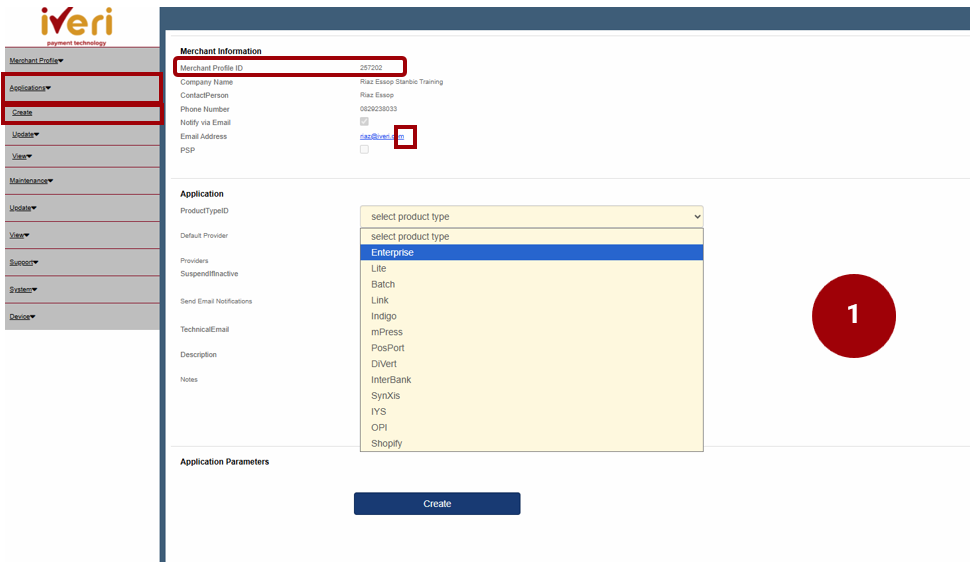
Under ‘Merchant information’ you would be able to view the details you have captured. The Merchant Profile ID has also been successfully generated at this point.
This screen will automatically appear.
Navigation Path to this screen:
Applications > Create.
The Yellow fields are mandatory to capture.
1. Application:
Please select the applicable Product Type ID from the dropdown. For this example, we have selected Enterprise as the Product Type ID.
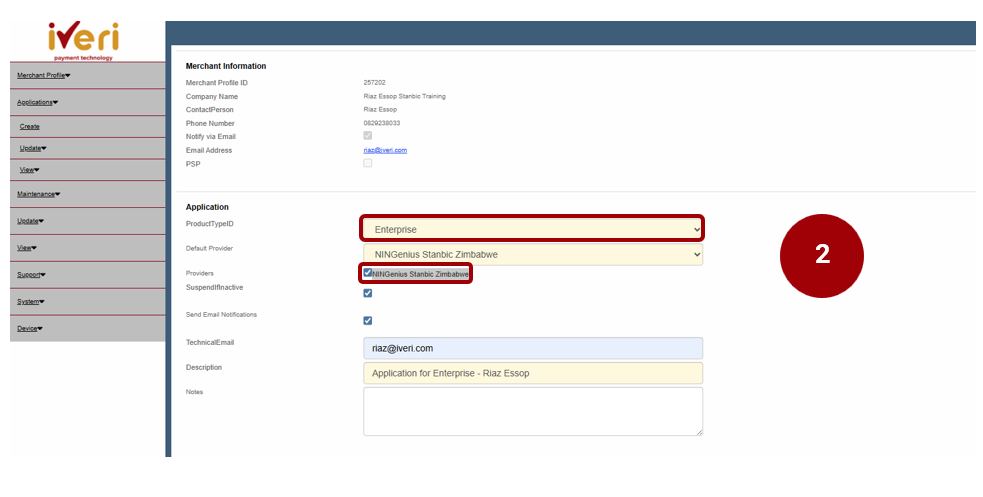
2. Let us have a look at some of the mandatory fields that need to be captured under Application:
Default Provider – The default provider is ‘NINGenius Stanbic Zimbabwe’.
Providers – Ensure that this is ticked at all times.
Suspend application if inactive – If ticked, a merchant’s application will be suspended if in active for excess of 90 days. If unticked, the application will remain active indefinitely.
Send Email notifications – It is recommended that this field is ticked. If there are any updates to the application, the merchant will be notified.
Technical Email – Update an e-mail address that you would like to receive notifications for should any changes be made to a Merchants application.
Description – Refers to the reference description you would like to use as an identifier for the application created.
Application Parameters
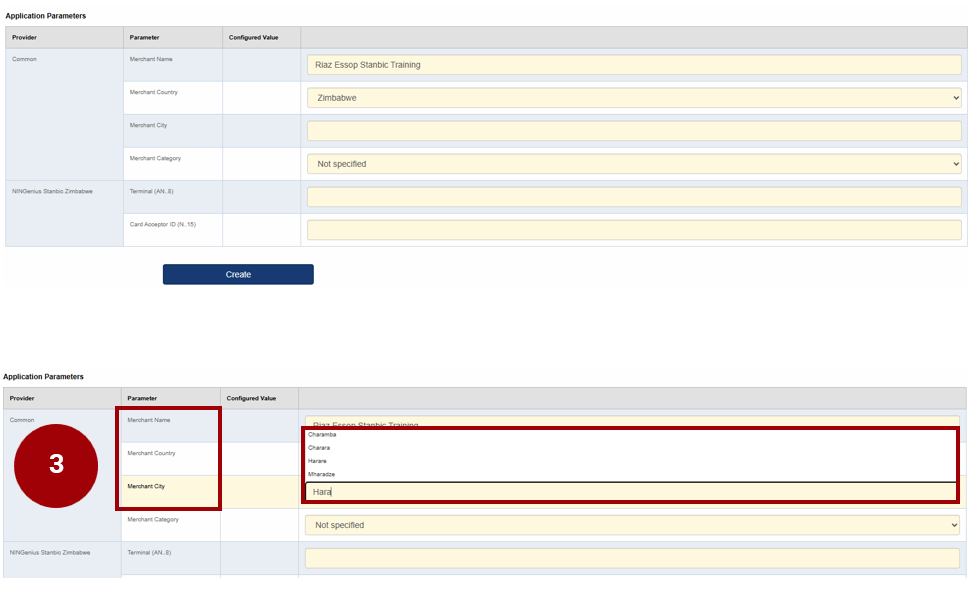
3. Application Parameters:
The Yellow fields are mandatory fields that would need to be captured.
Capture the Merchants’ name.
Merchant Country
Merchant City – Select the Merchant City from the populated list
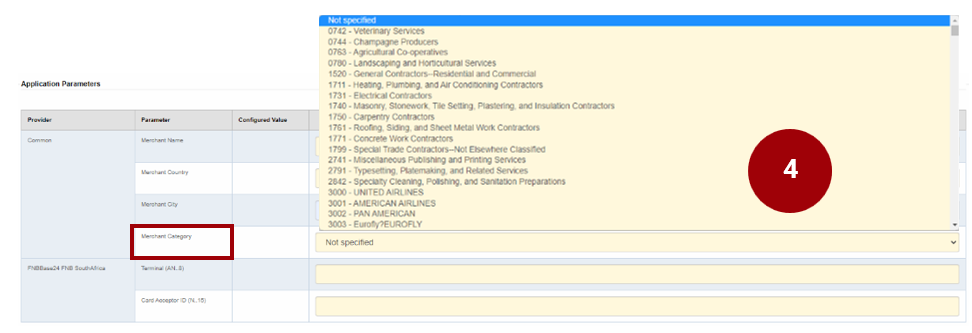
4. Merchant Category Code:
From the dropdown, please select the correct trade for the Merchant you are onboarding.
Note: The Merchant Category Code must be captured correctly for the Merchant and must reflect their specific trade.
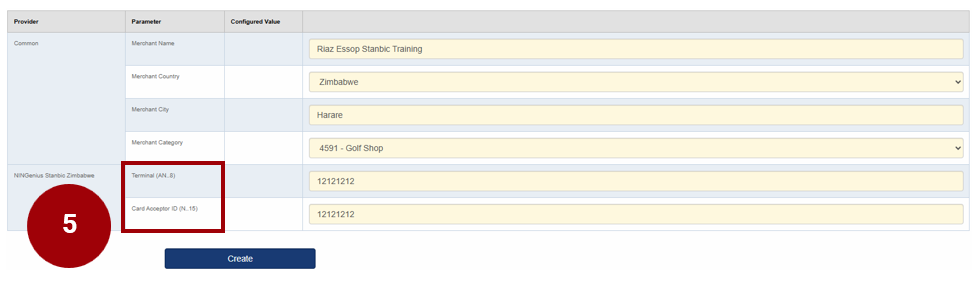
5. Complete the Application Parameter details as per below:
Terminal ID - Ngenius:
When a merchant is registered with Ngenius, a Terminal ID is allocated at the outlet level. This Terminal ID generated by Ngenius must be captured in the ‘Terminal’ field
If the merchant belongs to an aggregator, then the acquirer would need to obtain the terminal id from the aggregator.
Terminal (AN.8) in this example is 12121212
Card Acceptor ID:
When a merchant is registered with Ngenius, a Card Acceptor ID/MID is allocated, identifying the merchant account with the Acquirer. The Card Acceptor ID/MID generate by Ngenius, must be captured in the ‘Card Acceptor ID’ field
Card Acceptor ID/Merchant ID (N.15) in this example is 12121212
Lastly, before clicking on the create tab, please ensure that the details captured for the merchant are correct. Once you have done your checks, click on the ‘Create tab’.
Email Notifications
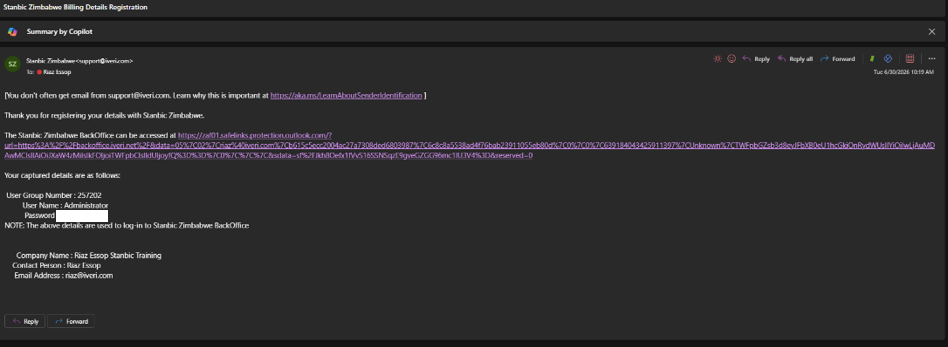
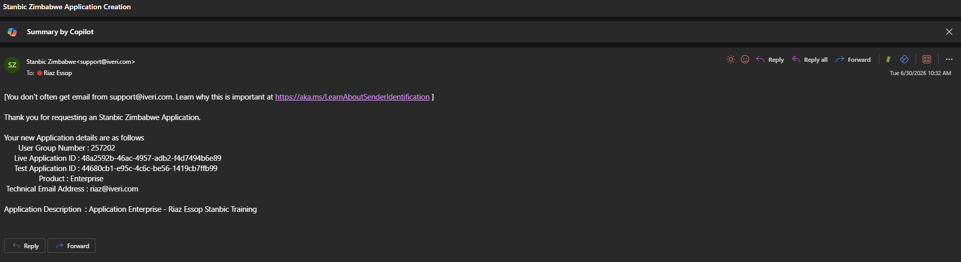
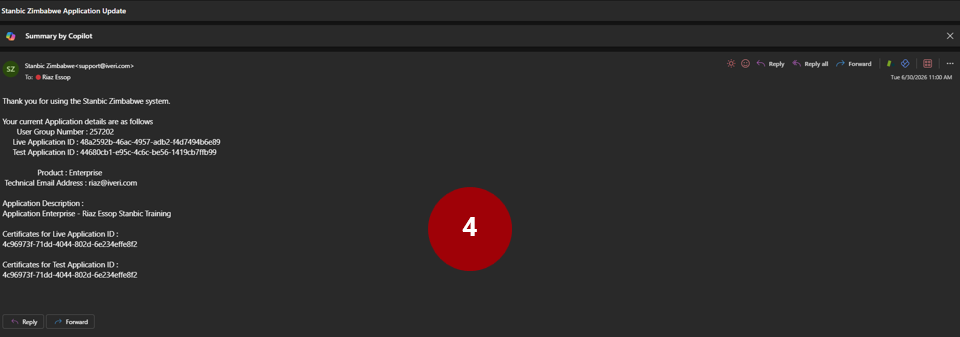
An automated system generated by e-mail will be sent as confirmation for the application that was created for the Merchant.
The e-mail confirms:
- Merchant Profile / User Group ID
- Live and Test Application IDs
- Product Type
- Confirmation of the Technical e-mail address captured.
- Application Description is captured on the application you have created.
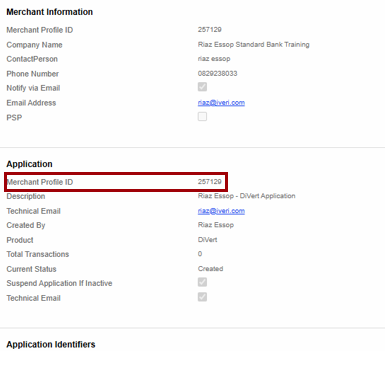
Note: Once the user has clicked on the ‘Create’ tab the BackOffice Services screen will appear.
From this screen you will note the Merchant Profile / User Group ID.
The Merchant Profile / User Group ID is especially important when logging a query. This must be provided at all times.
The Merchant Profile / User Group ID will also reflect on your daily report you receive.
BackOffice Services
Application Identifiers:
There are 2 application modes: Live and Test.
To ensure updates and changes are configured for a merchant’s application, select the LIVE application.
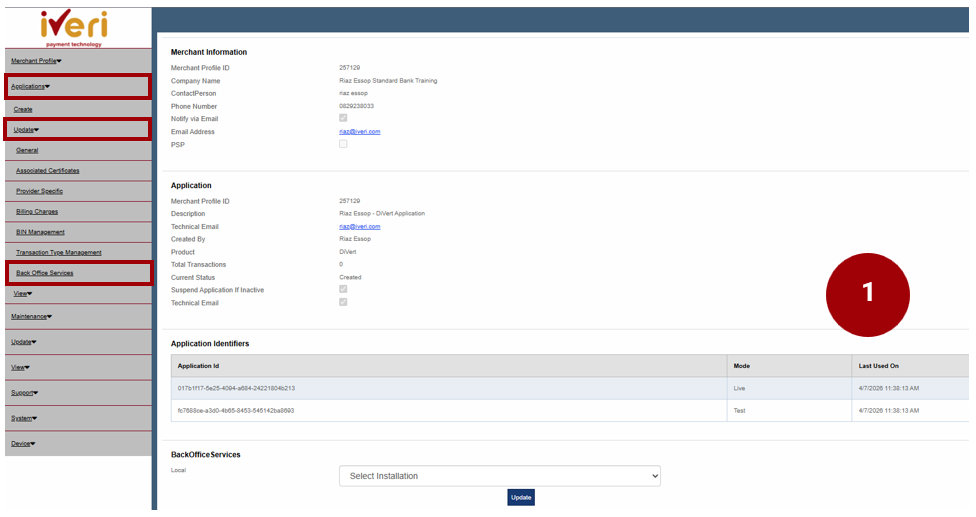
BackOffice Services:
How to navigate to the BackOffice Services screen:
Applications > Update > BackOffice Services
1. This is where BackOffice Services are created for the merchant. This is a mandatory step that would need to be updated in order to activate an application for a Merchant.
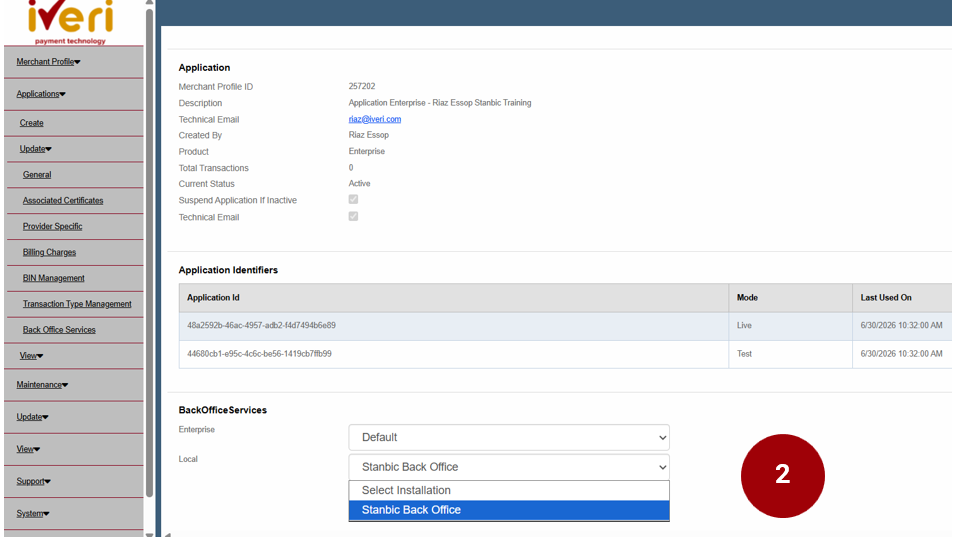
2. Under BackOffice Services, under ‘Local’, click on the dropdown and navigate your way to ‘Standard Back Office’.
This update will provide the Merchant access to BackOffice.
Once the user has captured the details under Local, click on the ‘Update’ tab.
This following screen will now appear.
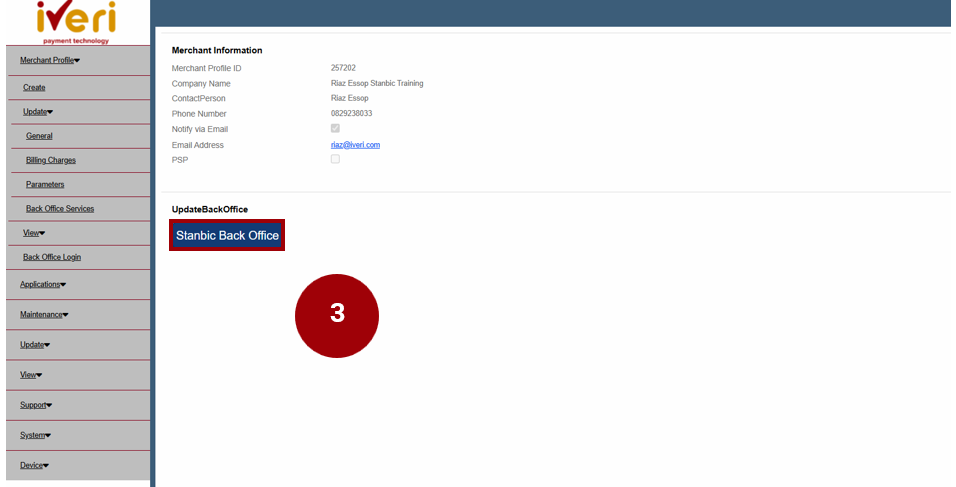
3. Under the ‘Update BackOffice’ tab, the user would need click on the ‘Standard Bank Back Office’ tab.
Note: The purpose of this update is to sync the new merchant application that you have created to iVeri BackOffice.
Additional BackOffice services configurations:
Users may be required to configure additional BackOffice Services for a Merchant. The Delta is dependent on the solution the merchant has agreed upon.
‘Enterprise’ configuration is an essential component for Enterprise setup within iVeri's eCommerce solution. The ‘Enterprise’ configuration under BackOffice Services only applies when the merchant is processing via an integrator or payment service provider. If this is not the case, this configuration should be left unchanged.
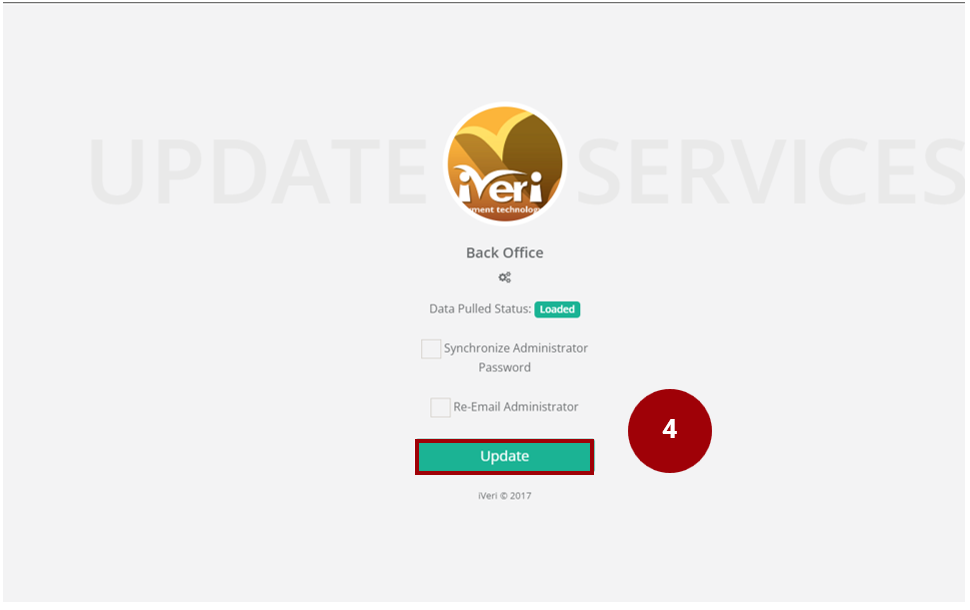
4. This Merchant page will appear. Click on ‘Update’ to synch the new application to BackOffice for this Merchant.
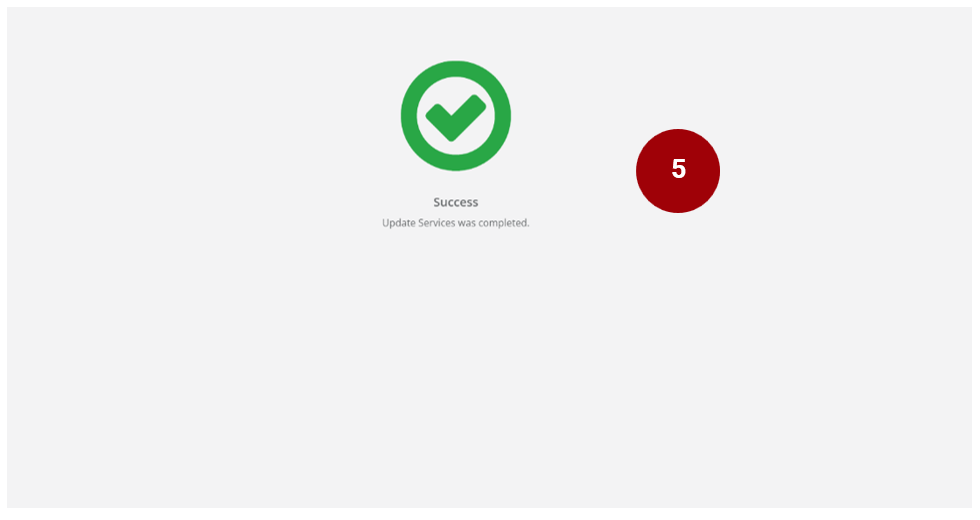
5. The following screen will appear confirming the successful update.
Setting Application Status to ‘Active’
In order for a merchant to begin processing transactions and conducting business, their application must be set to Active Status. If the status is not changed to Active, the application will exist in the system but will not function or enable trading.
When does an Application remain in ‘Created Status’?
Merchant Applications are kept in ‘Created’ Status throughout integration testing. Once validation is complete and iVeri Support has signed off the merchant, the application may then be transitioned to ‘Active’ Status. The Acquirer’s maintenance/Onboarding team will be responsible for setting the merchant’s application to ‘Active’ status on the Administration Website.
Integration testing applies to these products:
Lite
Enterprise
Next, we will review the process for setting a merchant to ‘Active’ status on the Administration Website.
Setting Application Status to Active
How to Navigate to this Screen:
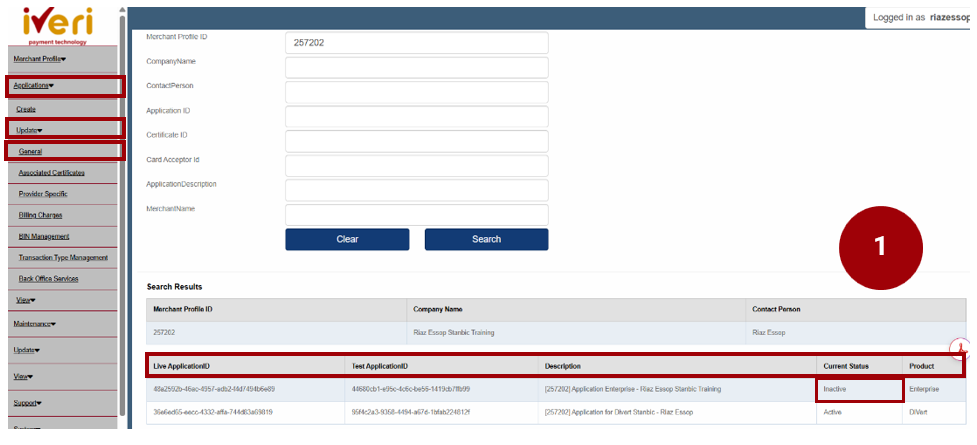
Applications > Update > General
The current Merchant application that you have created will be defaulted to ‘Created’ status.
The user would need to change and update the status from ‘Create’ to ‘Active’. Setting the application to ‘Active’ is a crucial step in the onboarding process, as it will allow the Merchant the ability to trade.
1. Click on the ‘Live’ Application ID.
The following screen will appear.
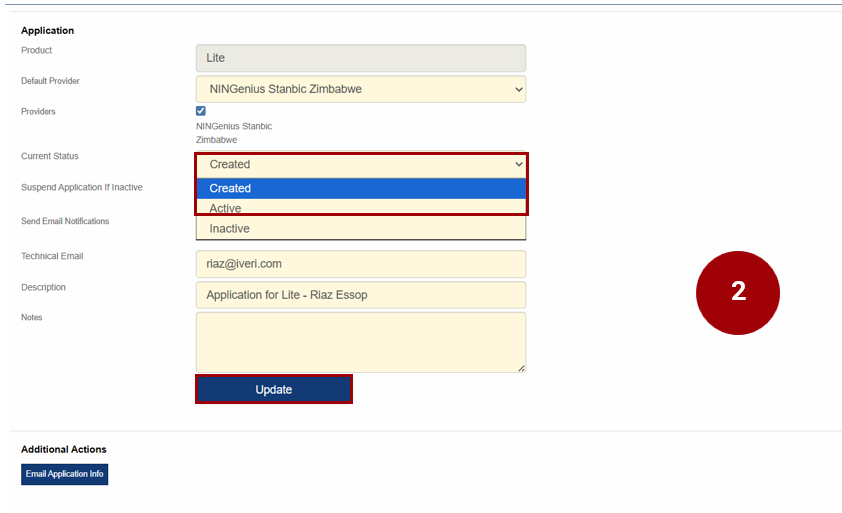
2. Navigate your way to ‘Current Status’ and from the dropdown select ‘Active’.
Once you have made the selection, click on ‘Update’.
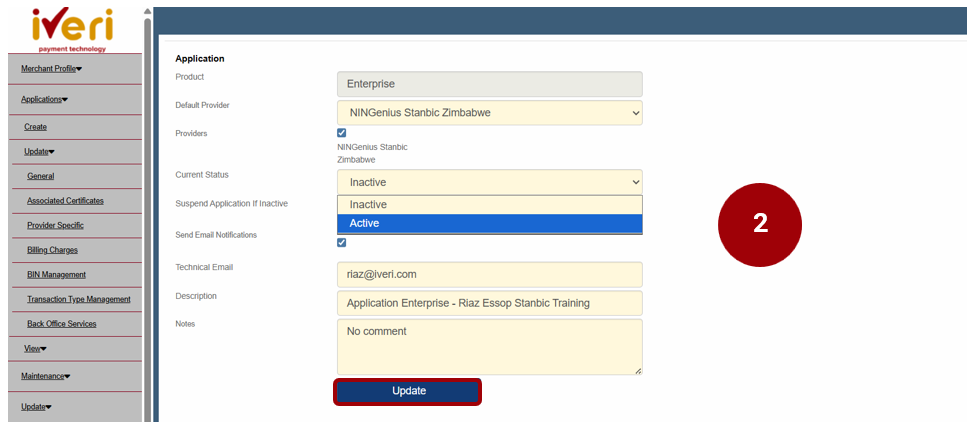
The below successful message will then appear on the top of the same screen confirming that the Update was successful:

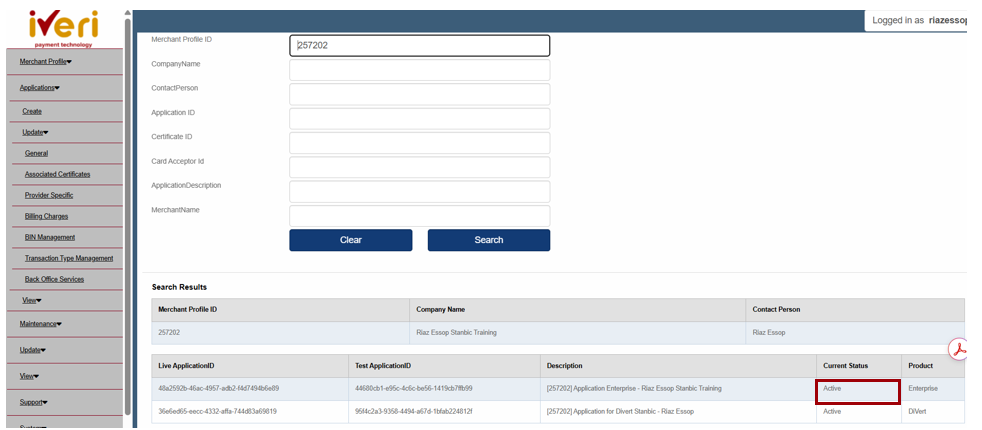
3. The application status has now been changed to ‘Active’.
4. This is a sample of the confirmation e-mail the Merchant will receive confirming that their application has been successfully updated.
3D Secure e-Commerce
3D Secure authentication is an additional layer of security used in online credit and debit card transactions. It is designed to provide increased protection against unauthorised use of cards for online purchases.
Key Benefits of 3D Secure Authentication:
- Enhanced Security: By requiring additional authentication steps, 3D Secure helps protect both customers and merchants from unauthorized transactions and fraudulent activities.
- Reduced Chargebacks: Authenticating transactions with 3D Secure can reduce the likelihood of chargebacks resulting from disputed or fraudulent transactions, providing greater peace of mind to merchants.
- Customer Confidence: Knowing that their transactions are protected by an extra layer of security, customers may feel more confident and secure when making purchases online, leading to increased trust and loyalty to merchants.
Overall, 3D Secure authentication plays a vital role in safeguarding online transactions, promoting trust between merchants, card issuers, and customers in the digital marketplace.
3D Secure enablement on the Administration Website
The activation of 3D Secure hinges on the specific terms outlined in the merchant agreement with Standard Bank and their corresponding Sales Manager.
These requirements, however, vary based on the individual Merchant and the activation status of 3D Secure, applicable to the following solutions:
- Divert
- Lite
- Enterprise
The documentation will cover the following use Cases for 3DS Enablement:
1. 3DS Enablement for DiVert & Lite
2. 3DS Enablement for Enterprise merchants where 3DS is processed via an External MPI
Use Case 1 – 3DS Enablement for Lite & DiVert merchants
For Lite and DiVert, the iVeri Gateway manages both 3D Secure authentication and end-to-end payment processing, as these functions are built into both products.
Please note: Should an Enterprise merchant want the iVeri Gateway to manage 3D Secure authentication, the same process will apply.
Should the Merchant be enabled for 3D Secure, the following steps must be followed:
Navigation path:
Applications > Update > Provider Specific
1. The following screen will appear. The user will select the product to configure and enable for 3D Secure. The DiVert application has been selected for this Example.
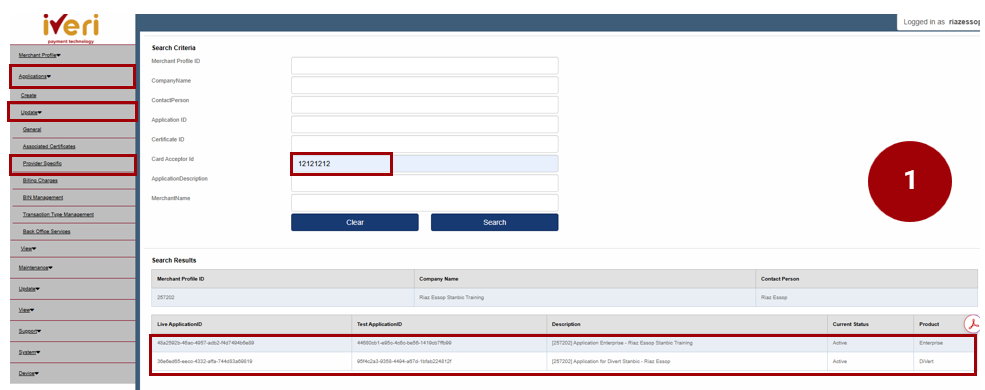
Navigate to the ‘Common Provider’ parameter and click on the expansion button.
Once you have expanded the ‘Common Provider’ tab, the following selections will appear.
2. From the list of parameters, please select the ‘Third party’ expansion button.
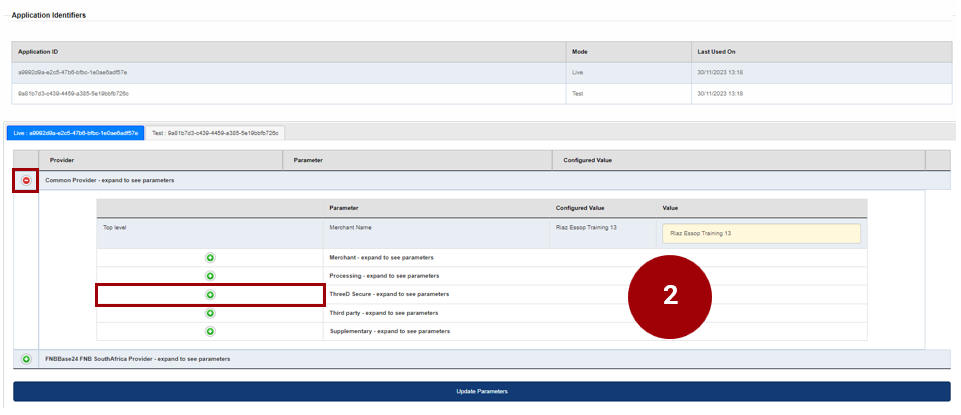
4. From the ‘ThreeD secure Parameter’ the user can now enable 3DS and select the 3D Secure Provider.
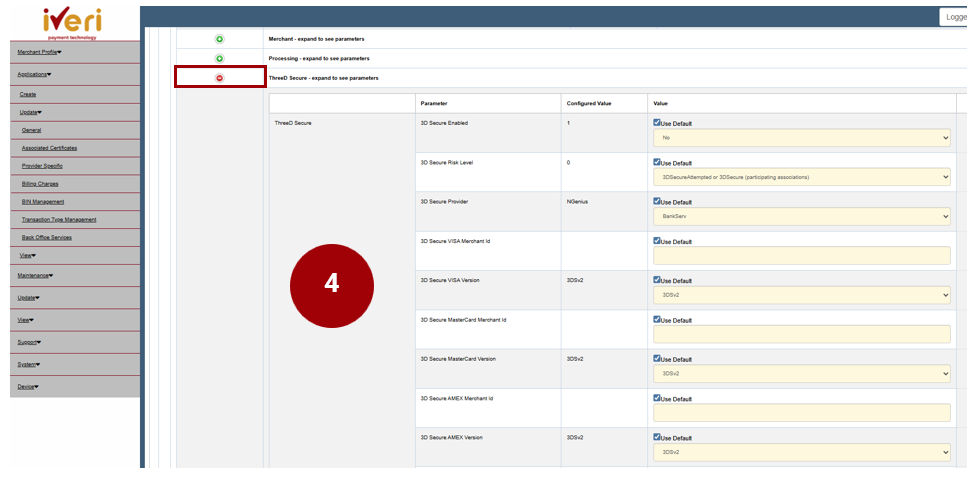
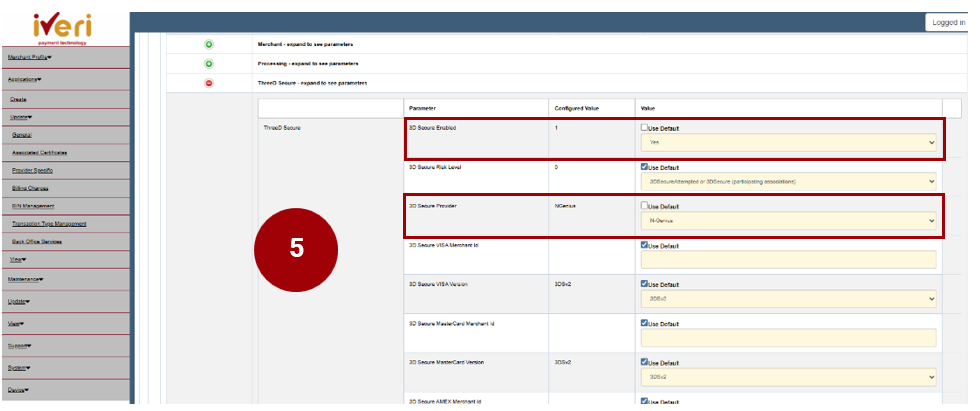
5. To configure the 3D to configure 3D secure, the following parameters would need to be configured:
3DS Secure Enabled: Untick default and change drop down to Yes
3D Secure Risk Level, is dependent on the merchant agreement but defaulted to ‘3DSecureAttempted or 3DSecure (participating associations)’.
3D Secure Provider: Remains ticked & defaulted to ‘Ngenius’
The Merchant ID’s per card association must be left blank.
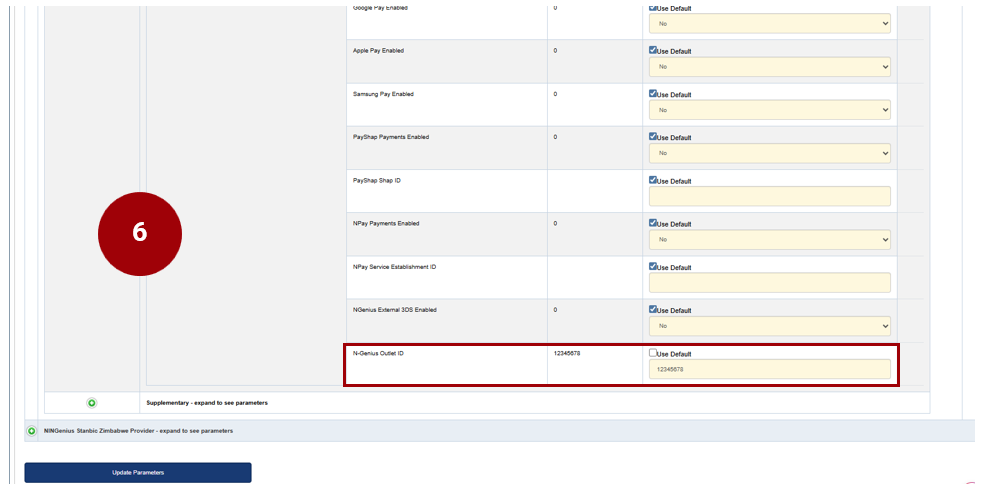
6. Next the user will navigate to the ‘Third Party’ Parameter. Here the user will capture the outlet ID, generated from Ngenius upon registration.
The user will scroll down to the ‘Ngenius Outlet ID’.
Untick the default box and capture the Outlet ID.
Lastly, ensure that all parameters have been captured accurately.
Click on the ‘Update Parameters’ tab to save changes.
The merchant has now successfully been enabled for 3D Secure.
Use Case 2 - Enabling 3D Secure for an Enterprise Merchant
When a merchant uses an external Merchant Plug-In (MPI) to perform 3D Secure authentication, the 3D Secure setup on the Administration Website must be configured differently. In this scenario, the authentication step is completed outside of the iVeri Gateway before the transaction is submitted for payment processing. As a result, the iVeri Gateway receives a transaction where 3D Secure has already been performed and must be configured to recognise and process it accordingly.
Below are the steps of the 3D secure enablement process for this Use case:
Navigation path:
Applications > Update > Provider Specific
1. The following screen will appear. The user will select the product to configure and enable for 3D Secure. The DiVert application has been selected for this Example.
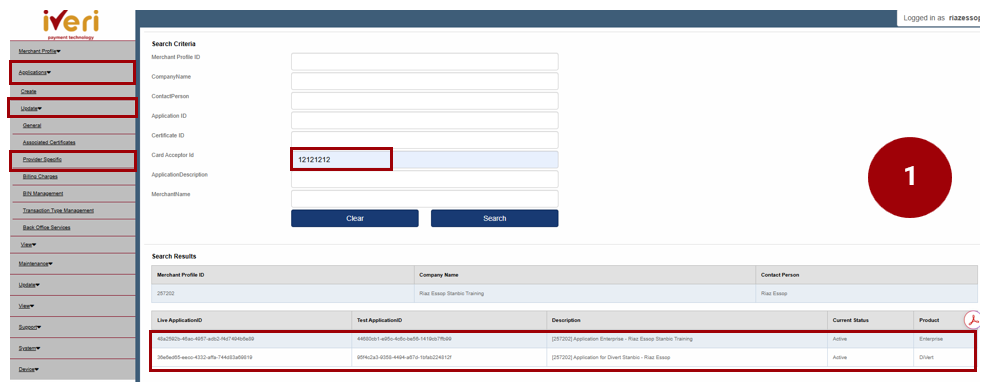
Navigate to the ‘Common Provider’ parameter and click on the expansion button.
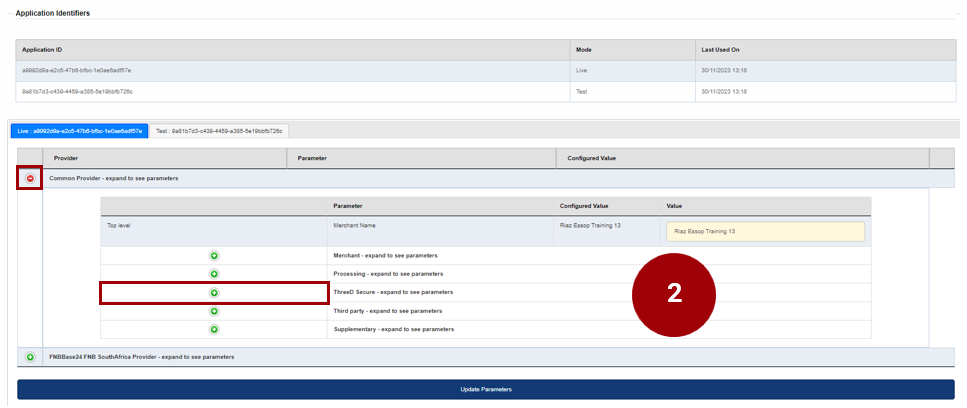
Once you have expanded the ‘Common Provider’ tab, the following selections will appear.
2. From the list of parameters, please select the ‘Third party’ expansion button.
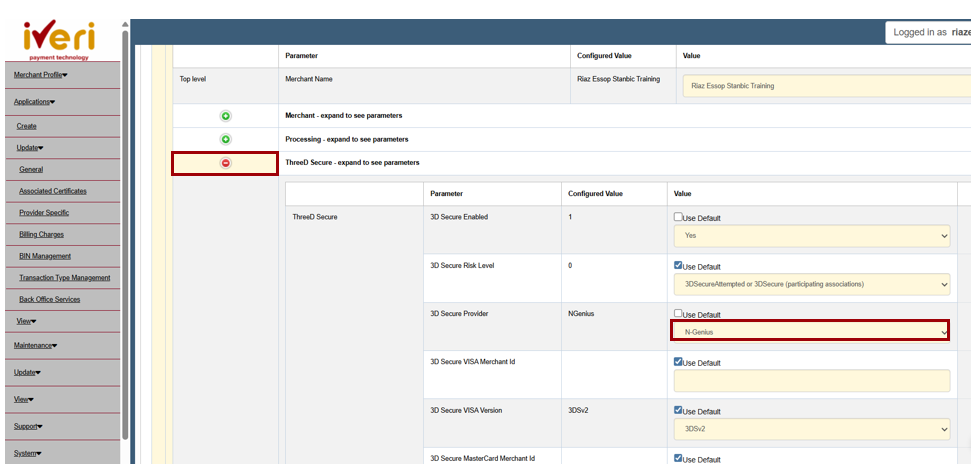
4. No configuration is done on the ‘ThreeD Secure’ Parameter. The ‘3D Secure Provider’ value will be defaulted to ‘N-genius’.
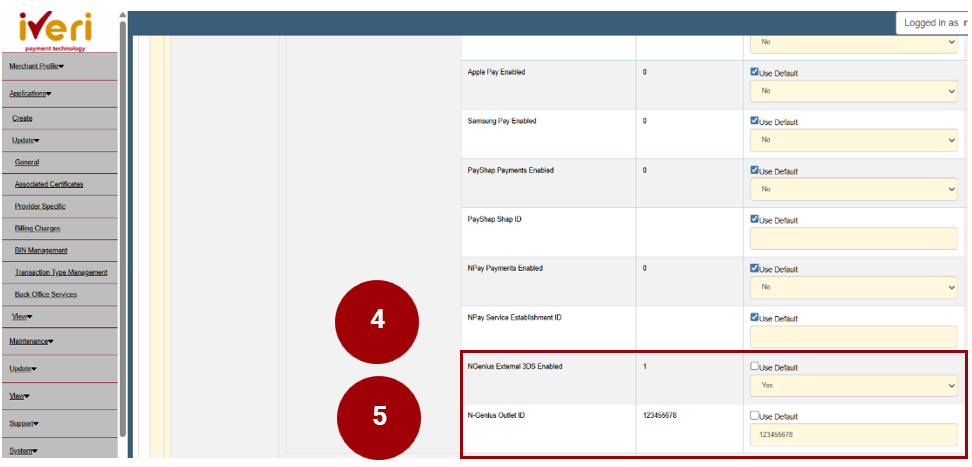
5.The user will navigate to the ‘Third Party’ Parameter. Scroll down to the ‘Ngenius External 3DS Enabled’ Parameter. This parameter is defaulted to ‘No’. Untick the default box and from the dropdown select ‘Yes’.
Next, the user will scroll down to the ‘N-Genius Outlet ID’.
Untick the default box and capture the Outlet ID.
Lastly, ensure that all parameters have been captured accurately.
Click on the ‘Update Parameters’ tab to save changes.
The merchant has now successfully been enabled for 3D Secure.
Capturing additional products using the same User Group ID
In some instances, based on the merchant’s business needs to accept various payment methods, there may be a requirement to have more than one iVeri solution. The process is simple, as there is no need for a user to replicate the entire take-on process.
Below, we will walk through the process of capturing an additional iVeri solution for a merchant using the same User Group ID.
1. From the menu, the user will navigate to:
Applications > Create.
Click on the Application found under ‘Search Results’.
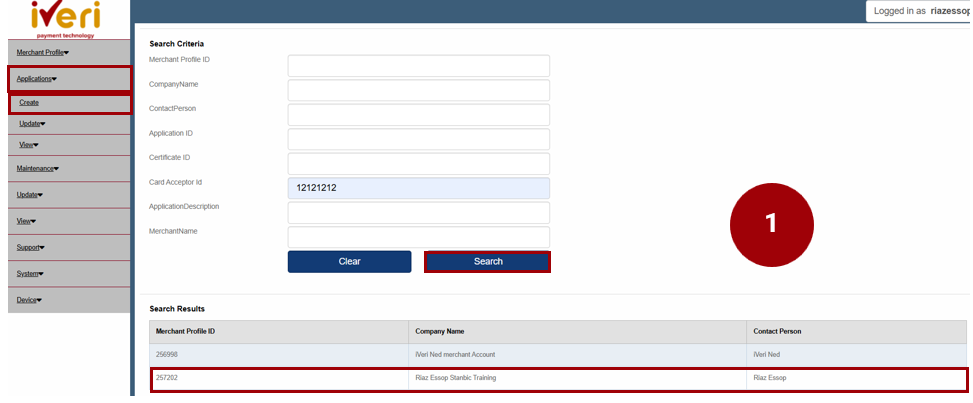
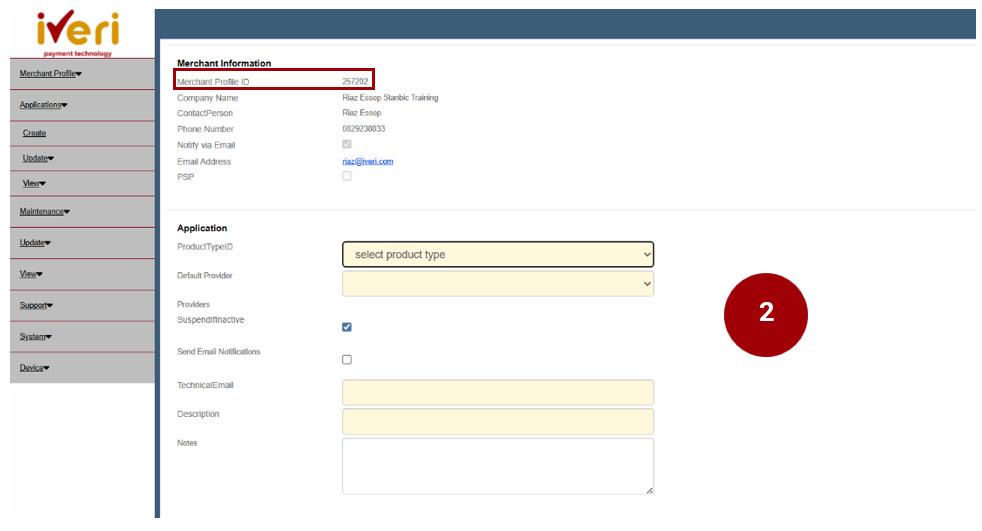
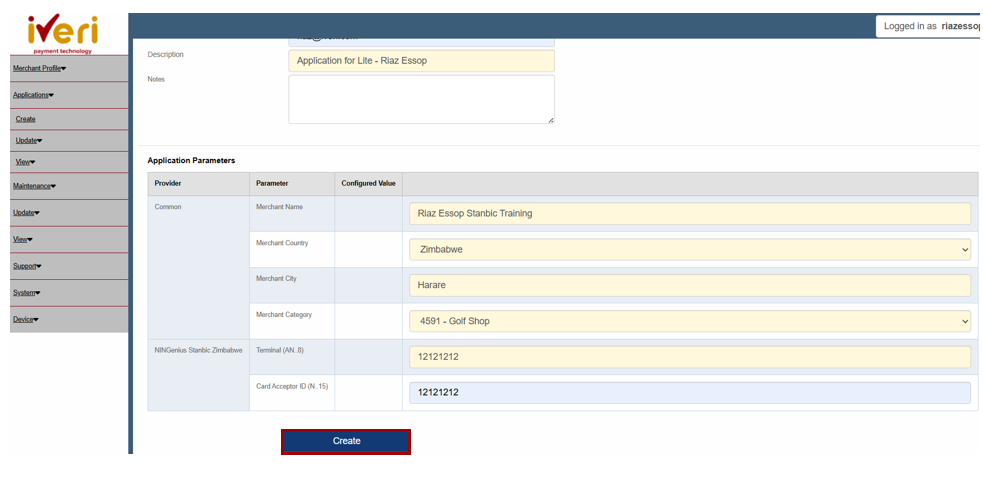
2. Populate all the mandatory fields in yellow:
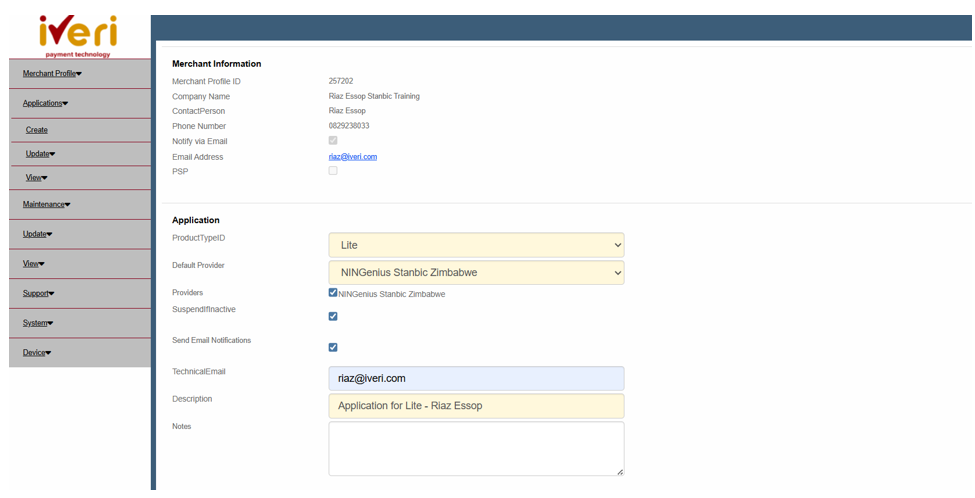
Product TypeID:
This crucial parameter is where the user will select from the dropdown, the iVeri solution for the merchant, based on the merchant agreement.
Default Provider:
The user will select the default provider/s listed here. This will vary per acquirer.
Suspend if application is inactive:
The user will check this box should they want a merchant application to suspend if inactive for a period of 3 months. Should the user check this box, and the merchant’s application is suspended due to inactivity, the merchant will not be able to process transactions until the suspension has been lifted.
Send email notifications and technical email:
Checking the box will ensure that the merchant receives e-mail notifications. The technical e-mail address can be captured here and may be different from the e-mail address captured under the merchant’s general information. The technical e-mail address will allow the merchant to receive e-mail notifications for any updates/ changes that are made to their application.
Description:
The user will select a description for the application. This is entirely up to the user or acquirer on what the standard description should be when capturing this specific field.
Application Parameters
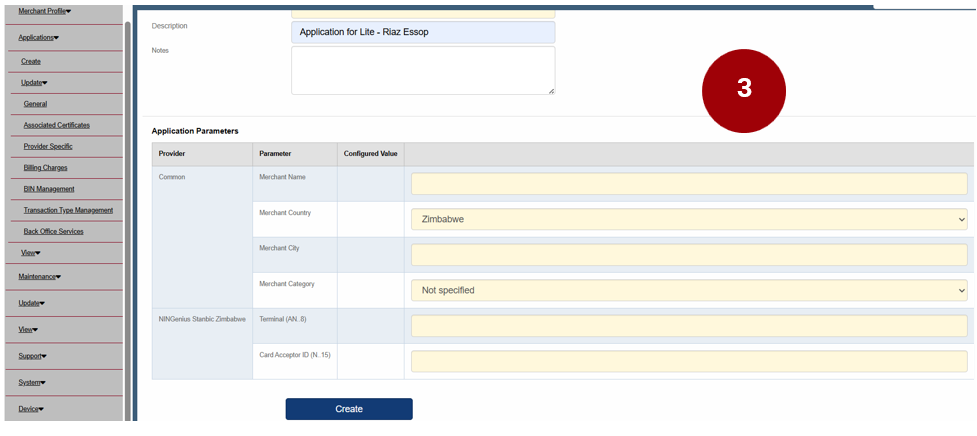
3. Here you would need to capture all the mandatory fields in yellow relating to the merchant:
Merchant name:
Trading name of the merchant
Country and city of merchant origin:
Accurately capture the country and city applicable to the merchant.
Merchant Category:
Select the merchant category that best represents the merchant’s line of business or industry.
Terminal ID:
This is a mandatory field that needs to be captured. Here the user will capture the Terminal ID that has been generated on the NGenius Portal upon registration of the merchant.
Card Acceptor ID:
This is a mandatory field that needs to be captured and is Acquirer dependent. Once you have done your checks, click on the create tab.
Lastly, click on the ‘Create’ tab to maintain the changes you have made.
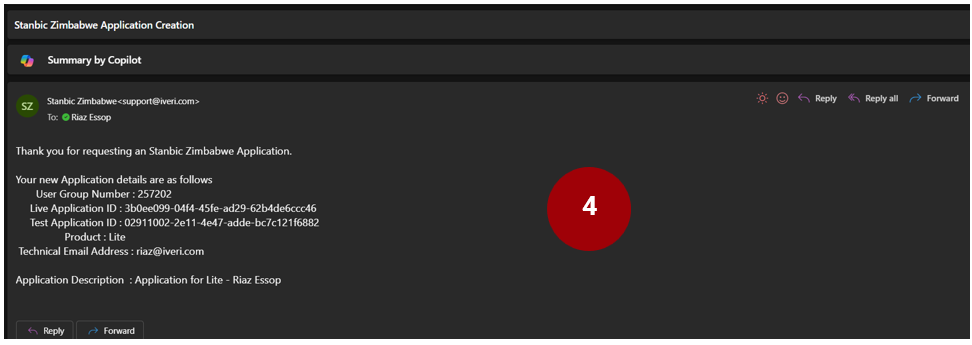
4. The merchant will receive the following e-mail notification.
BackOffice Services
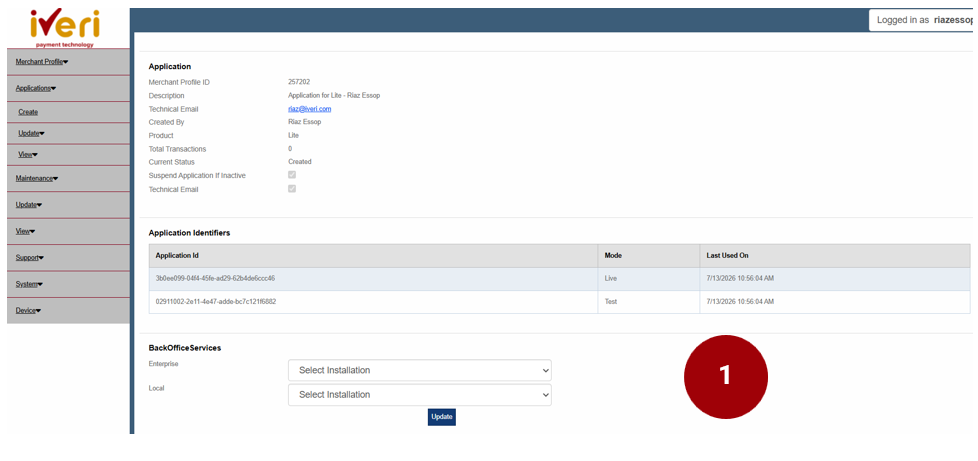
1. The user will automatically be directed to the BackOffice Services menu.
The navigation path:
Applications > Update > BackOffice.
Note: The purpose of this update is to sync the new merchant application that you have created to iVeri BackOffice.
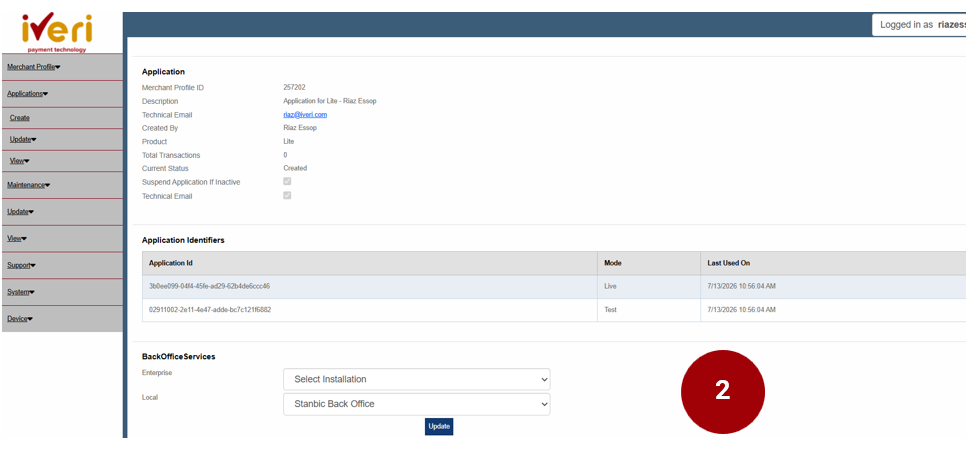
2. Under BackOffice Services, under ‘Local’, click on the dropdown and navigate your way to ‘Stanbic Back Office’.
This update will provide the Merchant with access to BackOffice.
Once the user has captured the details under Local, click on the ‘Update’ tab.
Application Parameters
This following screen will now appear.
3. Under the ‘Update BackOffice’ tab, the user would need click on the ‘Standard Bank Back Office’ tab.
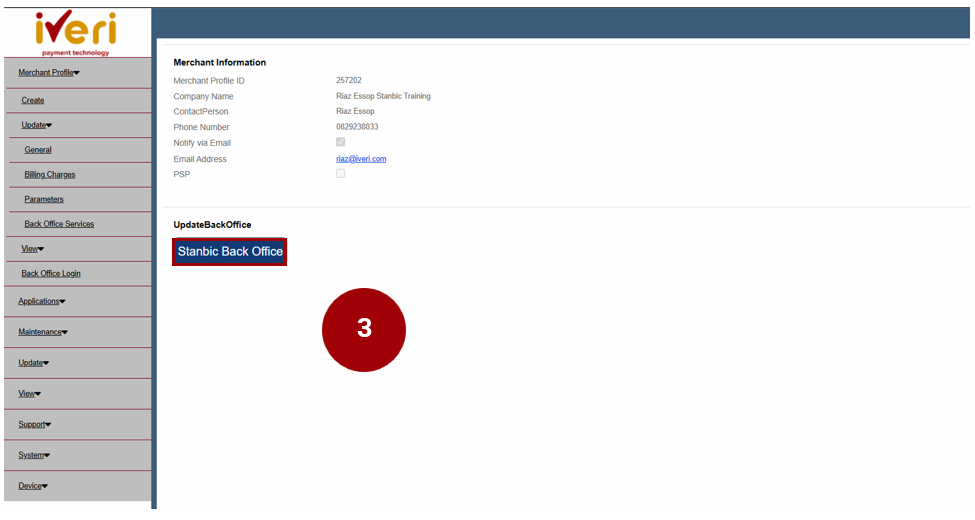
4. This Merchant page will appear. Click on ‘Update’ to sync the new application to BackOffice for this Merchant.
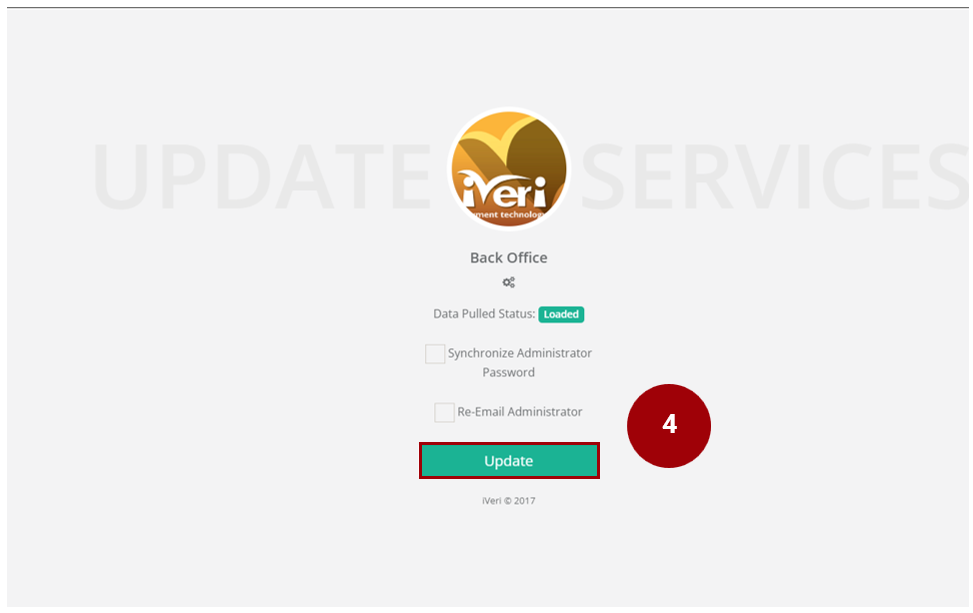
5. The following screen will appear confirming the successful update.
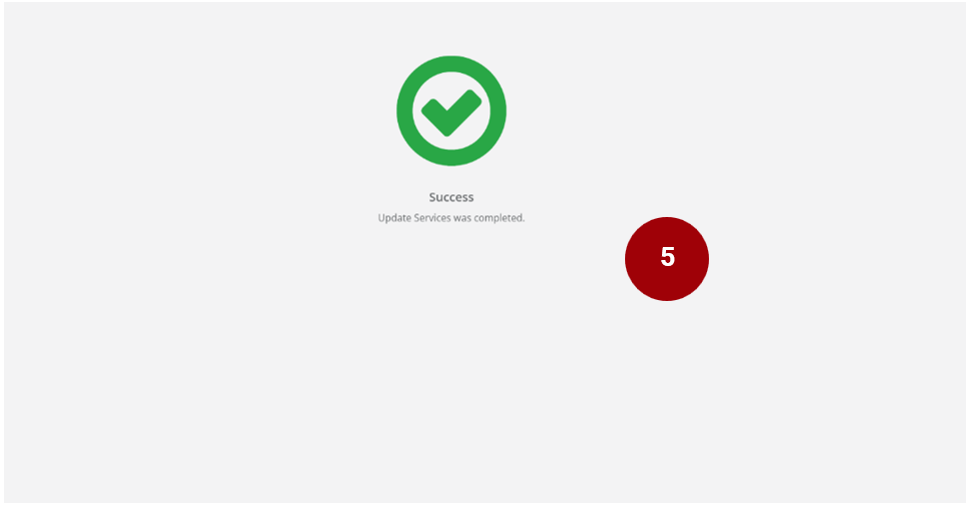
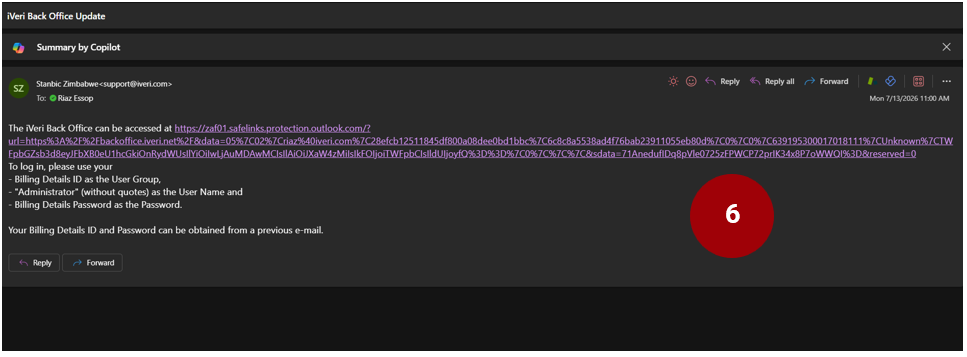
6. The merchant will receive the following e-mail notification which confirms that the added iVeri Product has now be synced in the Merchant BackOffice. The login credentials will remain the same as the previous login credentials shared.
Setting Application status to Active
Navigation path:
Applications > Update > General.
1. Select the Live Application ID/ iVeri Solution you would like to set to Active.
The user will be able to set applications that have been created to Active status including changing a merchant’s application that has been suspended due to inactivity, can be changed here.
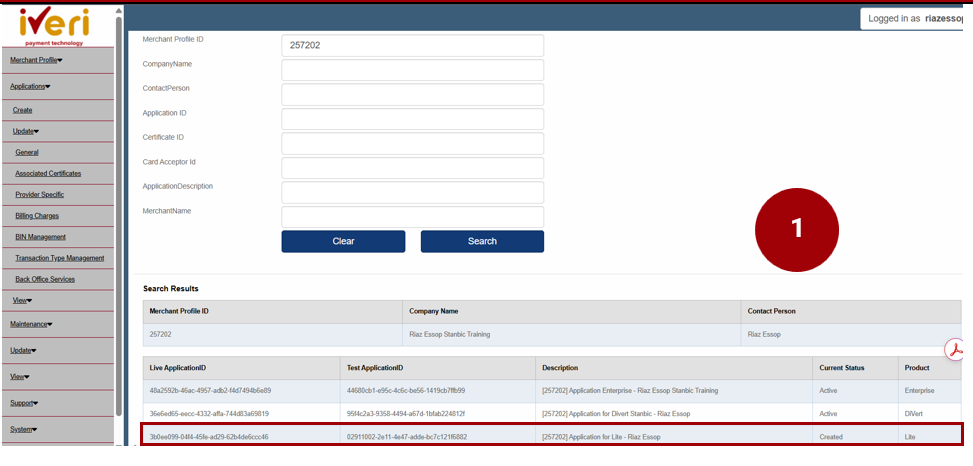
2. From the Application menu, navigate your way to the Current Status tab. From the dropdown, select ‘Active’.
Lastly, to ensure that these changes are in effect, click on the ‘Update’ tab.
Note: The next step, the user will repeat the steps in the 3D Secure enablement process.