Users
Add User
Purpose: To add/capture the details for a new user.

Action:
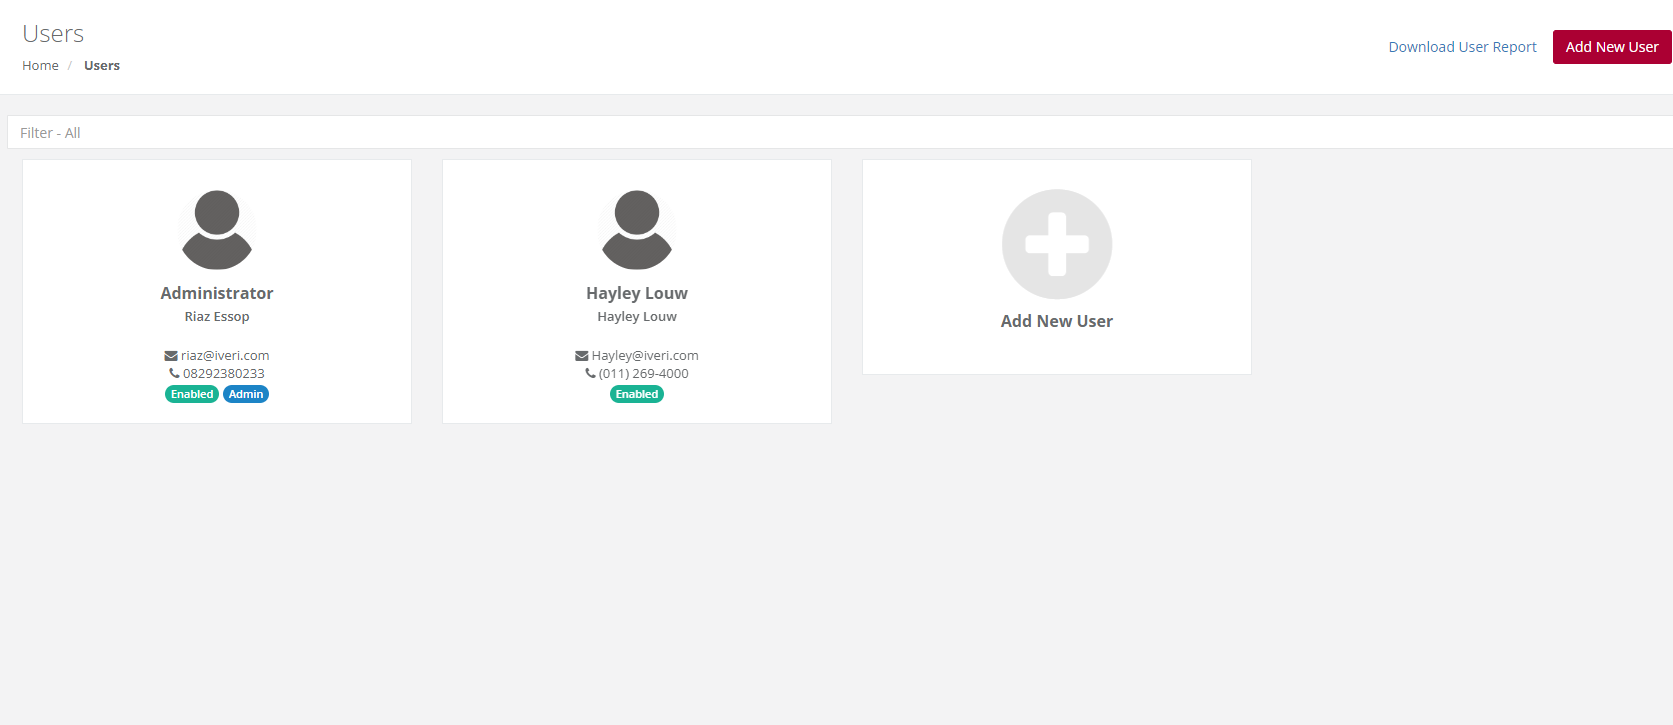
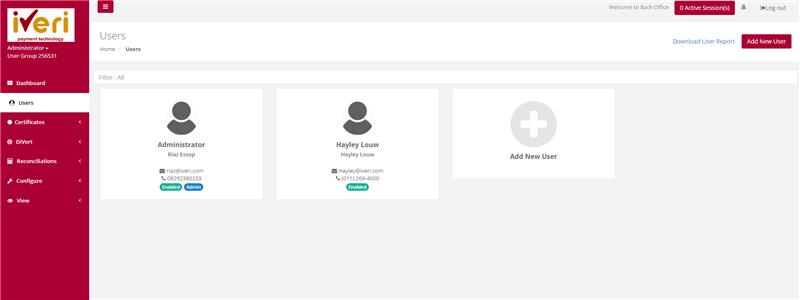
Hover over to Users. The following screen will appear.
Select “Add New User”. A resultant message will be displayed.
Select a username that is at least 6 Characters in length. Select a password for the user profile. The password must be at least 8 Characters in length. The password strength meter will indicate how strong your password is. Red, indicating a very weak password to green indicating a very strong password. It is always recommended that you use a combination of Alphanumeric and special characters when selecting a password.
Fill in all the mandatory fields (marked [*]) and click on “Save changes”.

Service Parameters
Purpose: The Administrator can configure permissions within the Service Parameters page from the Service Parameters menu. Let's explore the available configurations and delve into the details regarding these settings.

Action:
Select Users, select a particular user, and then select Service Parameters, based on the products used by the merchant choose Yes or No to a particular access rights and limits.
Save Changes once done.

Keep session alive – The system has a default session timeout of 5 minutes. If the logged-in session remains idle, the user will receive a notification that their session is about to expire. The Administrator can configure the session settings to allow the session to remain active for as long as the user is logged in.
Currency – Currencies available will be determined per Acquirer and according to the merchant’s agreement.
Default Currency – The default currency is set on a per - Acquirer basis.
Regarding reconciliations, when the Administrator accesses the reconciliations tab, they can configure whether reports and reconciliations can be emailed to the user. To enable this feature, navigate to 'Email report to merchant' and select 'Yes' from the dropdown menu. Similarly, navigate to 'Email recon to merchant' and select 'Yes' from the dropdown. If the Administrator prefers to restrict user access to reports or reconciliations, they can leave the Reconciliation tab unchanged.
View All Transactions – Once configured, this parameter enables a user to access and view all transactions generated by all users. Given that DiVert primarily functions by generating payment links, this feature grants user’s visibility into transactions created by all users. It's important to note that this parameter may vary depending on the iVeri solution in use. To configure this parameter, navigate to the ‘View All Transactions’ tab from the dropdown, select ‘Yes’.
E-mail Report – This e-mail report refers to trading on a specific product and varies from the Reconciliation report which provides a view of a settlement period. To configure this parameter, navigate to the ‘Email Report’ tab from the dropdown, select ‘Yes’.
Refund Amount Limit – Here the Administrator can configure and restrict if required, the Refund amount limit for this user. Please note that this configuration only applies if the user is granted permission to perform Subsequent transactions. We will cover this in a bit more detail, later on in this video.
Finally, to ensure that all service parameters for the user have been configured and applied, click on the 'Save Changes' button.
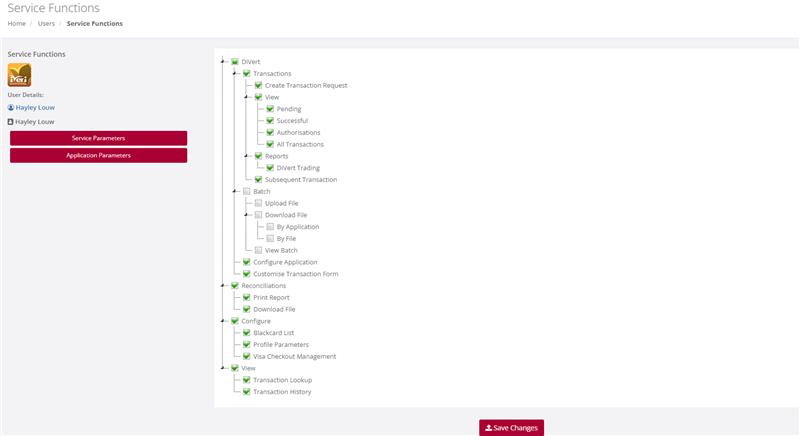
Service Functions
Purpose – Once the user has successfully set up the Service Parameters, the subsequent task involves configuring the Service Functions tailored to the user's needs. These functions enable the Administrator to accurately assign the user suitable permissions for executing designated tasks or accessing particular transactional data within the BackOffice system.
It's crucial to emphasize that permissions can differ based on the specific iVeri Solutions utilized by the Merchant. The Administrator's configurations for the user here dictates the accessible functions. In this instance, we'll set permissions for a user on DiVert. However, it's noteworthy that certain functionalities are generic and remain consistent across multiple iVeri Products.
Action:
Service Functions:
Once the user has successfully set up the Service Parameters, the subsequent task involves configuring the Service Functions tailored to the user's needs. These functions enable the Administrator to accurately assign the user suitable permissions for executing designated tasks or accessing particular transactional data within the BackOffice system. To configure these functions, locate and select the Service Functions Tab.
It's crucial to emphasize that permissions can differ based on the specific iVeri Solutions utilized by the Merchant. The Administrator's configurations for the user here dictates the accessible functions. In this instance, we'll set permissions for a user on DiVert. However, it's noteworthy that certain functionalities are generic and remain consistent across multiple iVeri Products.
Before granting permissions to a user, it is imperative that the Administrator understands which permissions would be crucial to the role for each user profile.
Selecting the DiVert tickbox, as shown, will configure all functionalities listed under the DiVert tab. This encompasses Transactions, enabling the creation of transactions, performing Subsequent transactions, allowing access to reports, configuring application settings, and Customizing transaction forms. Should you wish to adjust specific permissions, simply deselect the boxes corresponding to the functionalities you wish to restrict the user from accessing.
For Reconciliations – Determine if the user should have viewing and downloading privileges for reconciliations.
For Configure – Decide if the user should be able to blacklist a card, modify default profile parameters, or access Visa Checkout Management.
For View – Consider if the user should be able to conduct Transaction Lookups using identifiers to search for specific transactions.
For Transaction History – Determine if the user should have the ability to download the Transaction History for the last 6 months.
Ensure the permissions assigned are accurate. Click on the ‘Save Changes’ tab to apply the configured permissions to the user profile.
Save Changes once completed.
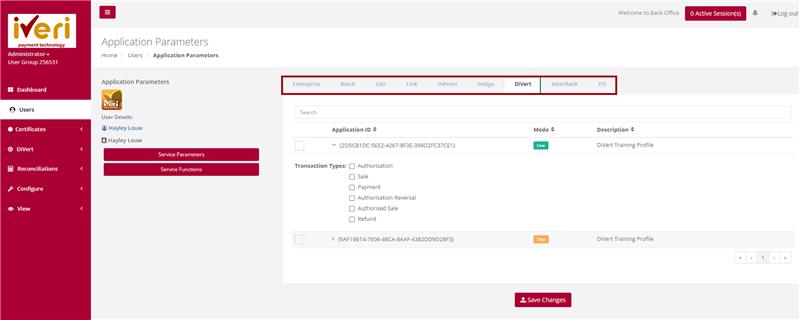
Application Parameters
Purpose – Once the user has successfully configured the Service Functions, the next step involves tailoring the Application Parameters for the user. This configuration enables the Administrator to customize Transaction Types per Application ID and per iVeri Solution. For instance, consider a large car rental merchant with multiple branches, each assigned a unique Application ID. The Administrator can specify which Application IDs the user will have access to and which transaction types they may execute. It's important to note that not all transaction types listed may be applicable depending on the iVeri solution. If the user needs to conduct transactions in both Test and Live environments, the Administrator must configure the Application IDs and Transaction types accordingly for both modes.
Action:
To configure the Application Parameters, start by clicking the tickbox as indicated for the relevant Application ID. Then, proceed to click on the Application ID itself. This action will expand the dropdown menu for Transaction types. From there, select the Transaction Types the user will be authorized to perform by ticking off the corresponding checkboxes.
If there are multiple products and several Application IDs, the Administrator must repeat this process for each product and Application ID assigned to the user.
Save Changes once complete.
Edit User
Purpose - To edit/change any of the user information previously captured, or to suspend a user from having access to BackOffice
Action:
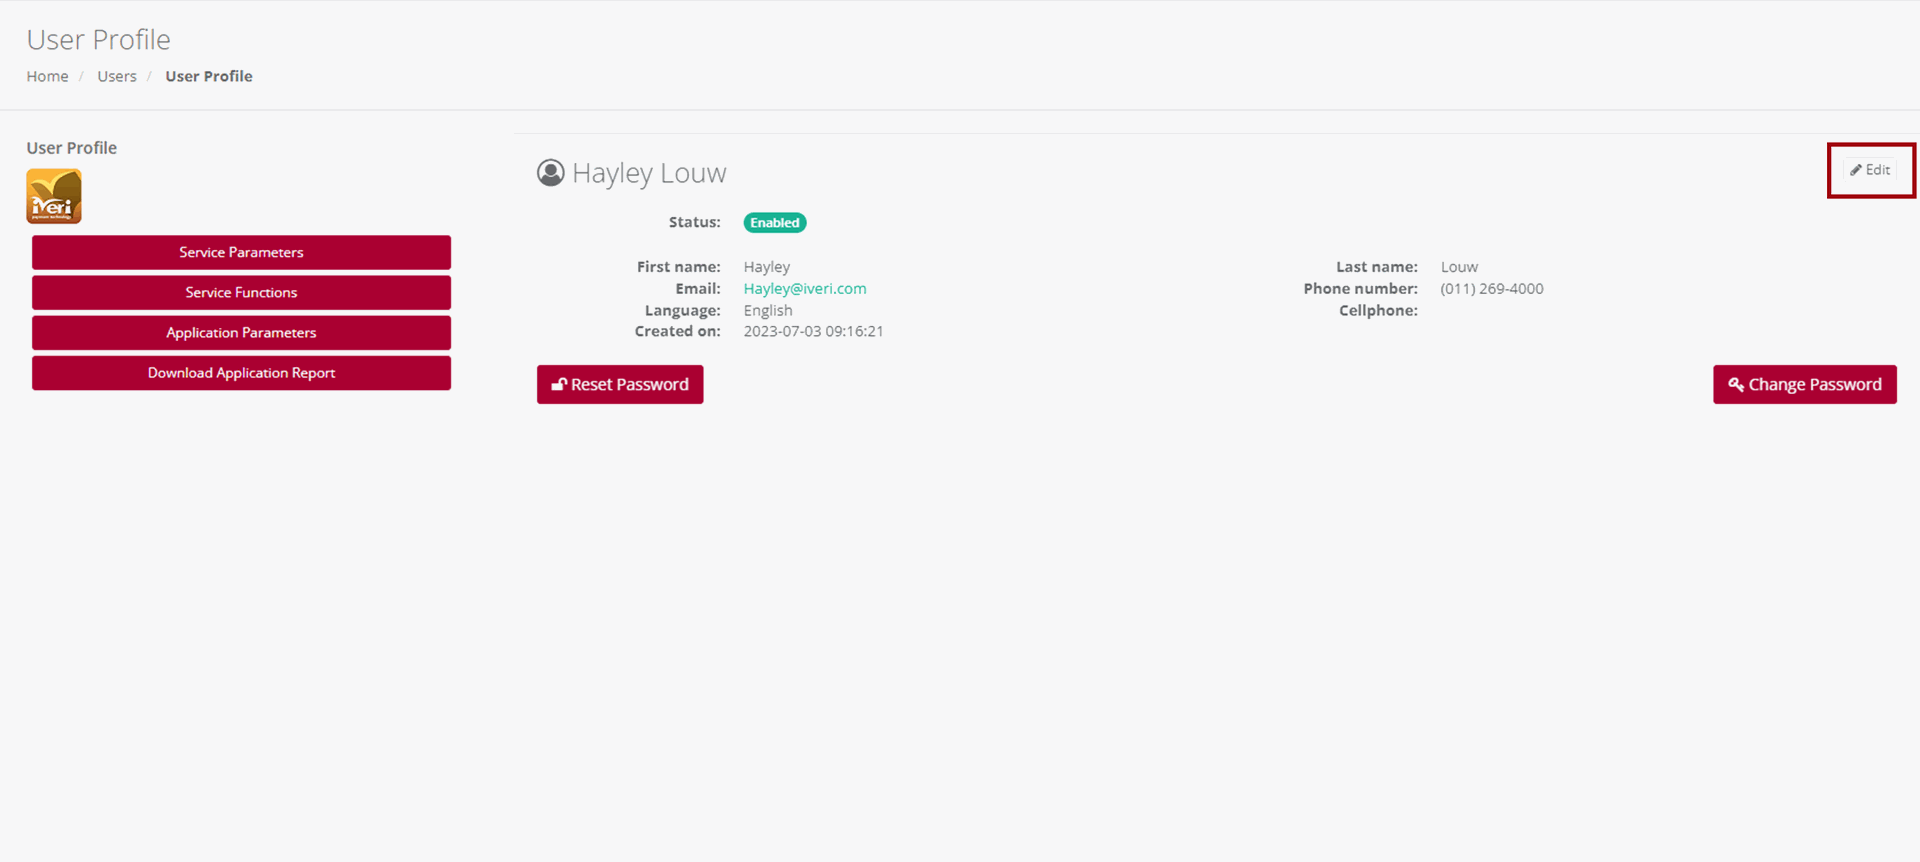
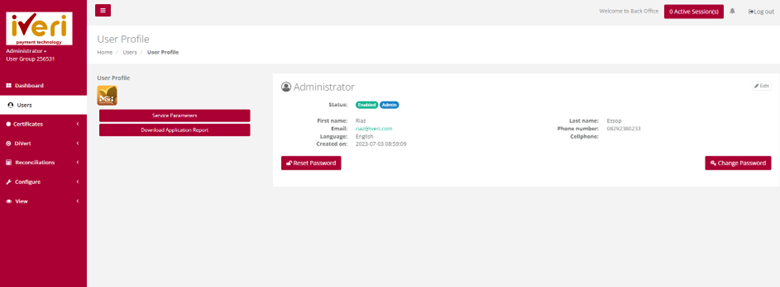
From the main menu the user will navigate to "User". Hover over the users’ profile you would like to edit and select the user’s icon.
Action:
Select the "Edit" button.
Please Note:
To change Password of the user to a new one, select either "Change Password" or "Reset Password".
Make the changes on the Users profile and click Save Changes to action the change.

Please note:
User profiles cannot be deleted but can be disabled by the Administrator. To do this, the Administrator needs to click on the "Enabled" radio button, which will change the status to disabled.
Reset Password
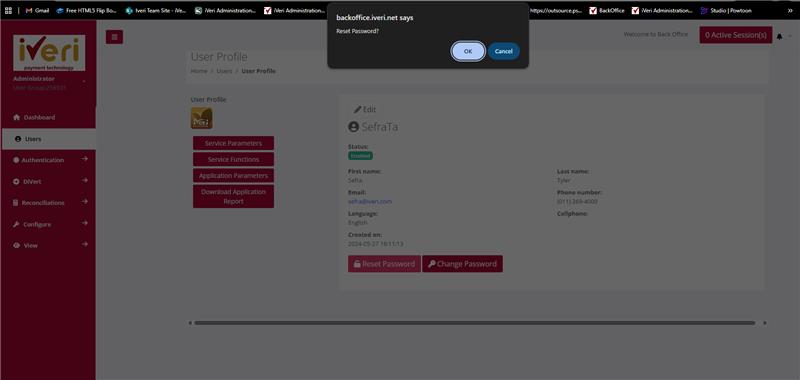
In certain situations, the Administrator may need to reset or change a user's password. To do this, go to the 'User' page and select the user whose password needs to be reset or changed. You will be redirected to the user's profile page.
To reset a password, click on the 'Reset password' tab.
A pop-up notification will appear; click 'OK' to confirm the reset.
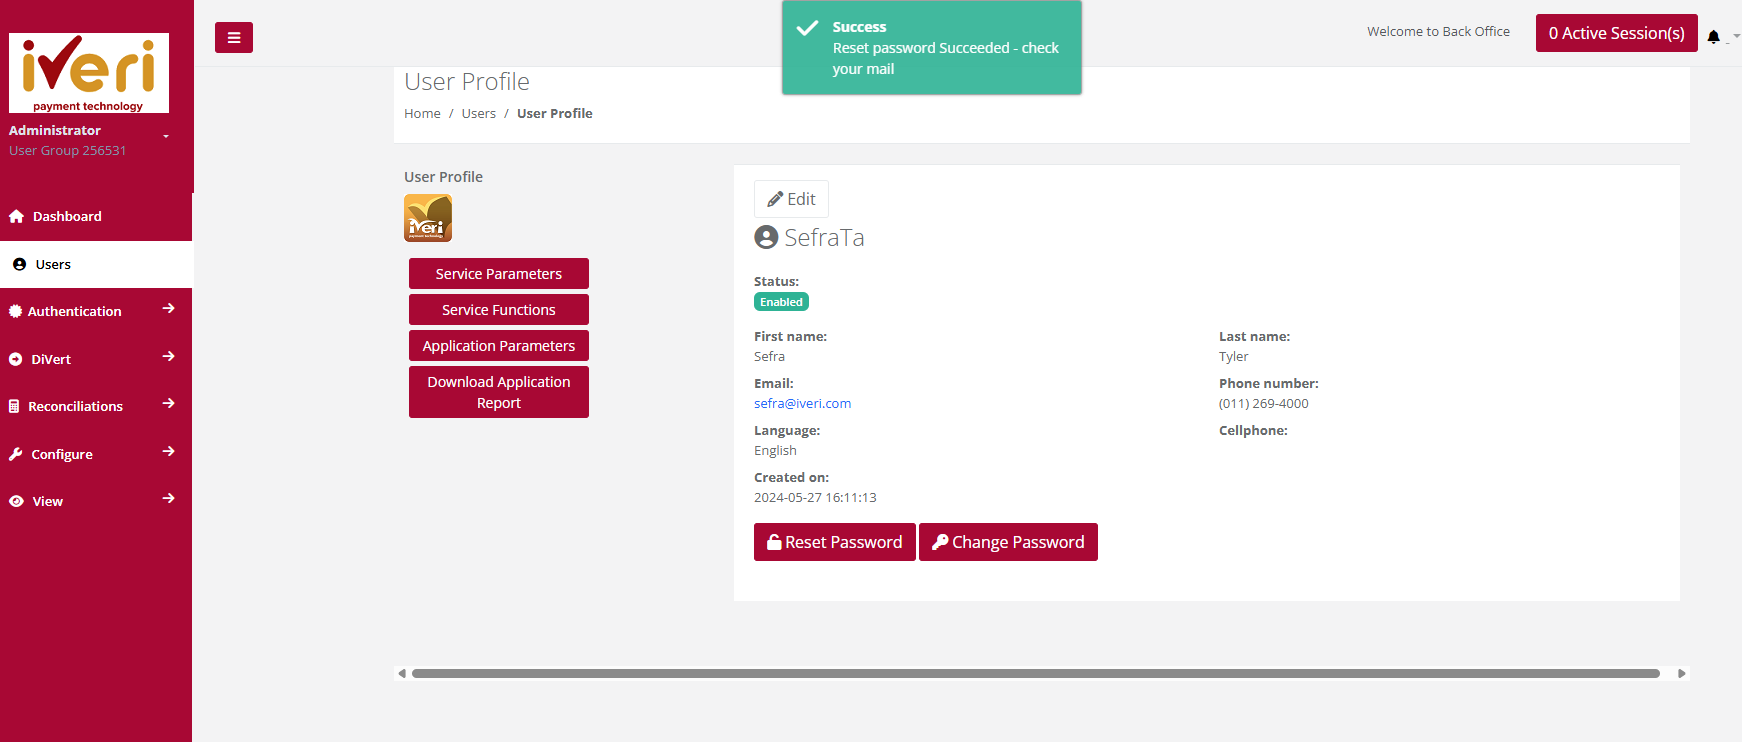
The following notification will appear on a successful password change.
Change Password
To change a password on behalf of a user, click on the 'Change Password' tab. The Change User Password form will appear, allowing the Administrator to set a new password for the user profile.
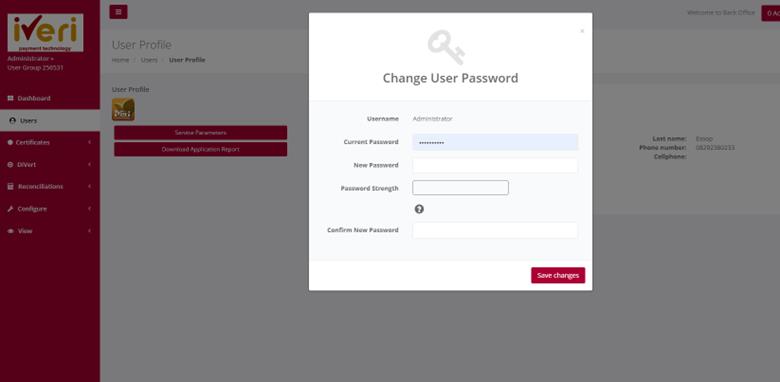
Ensure the new password is strong, containing alphanumeric and special characters. The password strength meter will indicate the strength of the password. Finally, click 'Save Changes' to confirm the password change.